
PowerShell 7 is the successor to PowerShell Core and the Windows PowerShell that is built into Windows. This article gives you a brief overview of the major new features and explains why it’s worth updating.
PowerShell 7 – the highlights
The key effect of this change is that PowerShell 7 is now available across Windows, Linux and MacOS platforms, not only locally, but also in the cloud and in hybrid infrastructures.
Furthermore, the update to .NET Core 3.1 promises improved performance, better compatibility with Windows PowerShell modules and other new features, which we will discuss in the following text.
PowerShell 7 Download and Installation
System Requirements
In contrast to Windows PowerShell, PowerShell 7 is not yet included by default in Windows installations, and Microsoft does not currently plan to remove Windows PowerShell preinstalled in Windows.
However, as described in the previous paragraph, PowerShell 7 is cross-platform and supports Windows, macOS, and Linux. According to Microsoft Docs (as of 2020-07-30), PowerShell 7 is currently available for the following x64 operating systems
- Windows 7, 8.1, and 10
- Windows Server 2008 R2, 2012, 2012 R2, 2016, and 2019
macOS 10.13 - Red Hat Enterprise Linux (RHEL) / CentOS 7+
- Fedora 29+
- Debian 9+
- Ubuntu 16.04+
- openSUSE 15+
- Alpine Linux 3.8+
- macOS 10.13+
Installation
There are several ways to install PowerShell 7. In general: since PowerShell is open source since 2016, the installation files are freely available for download from the PowerShell GitHub repository.
After the download is complete, simply double-click the file to install it.
On Windows, the installation can also be performed via “Steve Lee One-Liner” from Windows PowerShell:
iex "& { $(irm https://aka.ms/install-powershell.ps1) } -UseMSI"
Similarly, PowerShell 7 can be installed on Linux from the console using the following command:
sudo wget https://aka.ms/install-powershell.sh; sudobash install-powershell.sh; rminstall-powershell.sh
Detailed information on the corresponding procedure on Windows and Linux can be found on the blog of Thomas Maurer, Senior Cloud Advocate at Microsoft.
Using PowerShell 7 on Windows
Of course you can also use PowerShell 7 with the new Windows Terminal for Windows 10. You can even work with PowerShell and Command Prompt in parallel if you want: By default, Windows Terminal uses PowerShell 7, but you can open Windows PowerShell, Command Prompt, Azure Cloud Shell, and any remote shell (winrm/ssh) in tabs in parallel. You can even include the Unix shell if you have the Windows subsystem for Linux installed in Windows.
Using PowerShell 7 on Linux
The integration of these platforms not only brings advantages for existing PowerShell users, who can now transfer their know-how to new infrastructures. It also brings advantages for Linux users, respectively Bash-users, who can now also work with objects instead of just strings within PowerShell.
It is important to note that SSH is a critical component of PowerShell 7 remote administration of Linux machines, as it enables true PowerShell remoting between Windows and Linux machines.
PowerShell 7 versus Windows PowerShell
Compatibility
PowerShell 7 includes many new cmdlets and operators, and only a few cmdlets, such as the WMI cmdlets, have been removed. However, not all Windows PowerShell modules are compatible with the new shell. In such cases, Windows still allows you to use Windows PowerShell in parallel (as described in the previous text).
You can display a list of all locally available modules that you can use with PowerShell 7 by using the Get-Module -ListAvailable command (Figure 1).
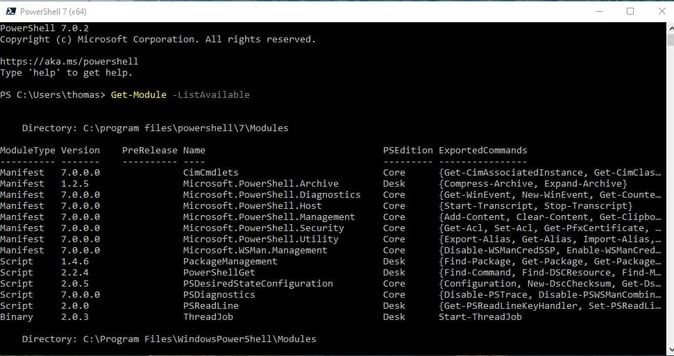
Figure 1: Outputting PowerShell modules for use with PowerShell 7
For an overview of the modules published by Microsoft that work natively with PowerShell 7 or are compatible with PowerShell 7, see the online compatibility list.
Windows users can also use the Import-Module cmdlet with the -UseWindowsPowerShell parameter. This command makes it easier to switch to PowerShell 7 and enables you to continue to use Windows PowerShell modules. The parameter creates a proxy module in PowerShell 7 that uses a local Windows PowerShell process to implicitly run all the cmdlets that are included in that module.
Of course, not all of the cmdlets that are optimized for Windows are available in the Linux and macOS versions. But again, Microsoft is constantly making improvements. However, you can expect that Linux and macOS will certainly never have the same set of cmdlets available as Windows.
Differences
The following table gives an overview of the basic differences between Windows PowerShell and PowerShell 7.
SSH-based PowerShell remoting
One of the most significant new features of Powershell 7 is certainly the introduction of SSH as network protocol for PowerShell remoting. SSH remoting is available for all platforms, enabling true multi-platform PowerShell remoting.
As part of this change, a new set of parameters to support SSH remoting connection has also been added to the New-PSSession, Enter-PSSession, and Invoke-Command cmdlets:
[-HostName ] [-UserName ] [-KeyFilePath ]
Ternary Operator “a ? b : c”
The new ternary Operatora a ? b : c allows you to formulate a simplified “if-else” statement.
The syntax is as follows:
[condition] ? [if-true] : [if-false]
[condition] stands for the conditional expression to be evaluated. The result of this evaluation is converted into a Boolean value. This in turn determines which expression is executed in the sequence. A simple example. We want to check whether the equation 10*5 = 20 is true or false:
$total = 10*5 -eq 20 ? 'yes' : 'no'
Another example in which we want to check whether the system used is MacOS, Linux or another (Windows).
# PowerShell 7
$IsMacOS? 'You are on a Mac' : $IsLinux? 'You are on Linux' : 'You must be on Windows’
# Windows PowerShell
If ($IsMacOS) { 'You are on a Mac' } elseif ($IsLinux) { 'You are on Linux' } else { 'You must be on Windows' }
Pipeline chain operators && and ||
The pipeline functions that could be used with | were from the beginning on a big advantage of PowerShell compared to the old command prompt. It allows several commands to be connected in series to perform common actions (as “mini-scripts”, so to speak).
Since PowerShell 7, multiple pipelines can be linked together conditionally. PowerShell 7 provides the pipeline chain operators && and|| for this purpose. Both operators have the effect that individual parts of the pipeline are only executed under certain conditions.
The difference between the two operators is that when you use &&, the right part of the pipeline is only executed if the left part of the pipeline has not returned an error (“execute when the previous one does not return an error”). Example:
Write-Output 'Hello' && Write-Output 'World'
# Output
Hello World
In the above example, both parts of the pipeline are executed without errors.
In contrast, when using ||, the right part of the pipeline is executed only if the command in the left part of the pipeline returns an error (“execute only if the previous one returns an error”). Example:
Write-Output 'Hello' || Write-Output 'World'
# Output Hello
In the second example, the left part of the pipeline was executed without errors, therefore the right part of the pipeline is not executed.
Another example:
Get-Process notepad -ErrorAction SilentlyContinue || "Notepad process is not available"
If Notepad is running, information about the process will appear, if not, the text “Notepad process is not available” will appear (Figure 2).

Figure 2: Output of the chained PowerShell pipeline
A detailed explanation of the new pipeline chain operators in PowerShell 7 can be found in the Microsoft Docs.
NULL Condition Operators: ?? and ??=
Similarly to the new Pipeline Chain Operators, the new NULL Condition Operators are used to perform a conditional query:
The NULL coalescing Operator ?? returns the value of its left operand if it is not NULL. Otherwise, it evaluates the right operand and returns its result. Example: It should be checked if $x is NULL.
# $x is assigned the value $null
$x = $null

# the new operator ?? is used to check whether the left operand $x is NULL
$x ?? 100

# since this is true, the right operand "100" is evaluated and its result is returned
100
The NULL assignment operator ??= assigns the value of the right operand to the left operand, if the left operand is evaluated with NULL. An example: If $x is NULL, the value “100” should be assigned to it.
# $x is assigned the value $null
$x = $null

# now ??= is used to check whether the left operand $x is NULL
$x ??= 100

# since this is true, the right operand "100" is evaluated and its result is assigned to the left operand
$x
100
ForEach-Object -Parallel feature
The Foreach-Object command previously only allowed an operation to be performed sequentially on a collection of input objects. Parallel processing of objects in the pipeline was only possible by using the PSWorkflow Cmdlt.
With the new -Parallel parameter set, PowerShell now offers this option in a ForEach-Object loop:
ForEach-Object
		[-InputObject ]
		-Parallel
		[-ThrottleLimit ]
		[-TimeoutSeconds ]
		[-AsJob]
		[-WhatIf]
		[-Confirm]
		[]
The ThrottleLimit parameter can be used to limit the number of threads that are processed in parallel to ensure that processor cores are not overloaded.
For script blocks that involve long waiting time when no processing power is required, it is useful to set a higher ThrottleLimit than the number of available processor cores.
It should be noted that multi-threading itself creates some overhead, as a separate runspace must be created for each of the script blocks that are executed in parallel. Therefore, this procedure is only worthwhile for longer, computationally intensive operations.
Here is an example of a possible use case: several ports should be queried via the Test-NetConnection command. In the first part, the ForEach-object loop is processed sequentially:
# Sequential processing
Measure-Command {
		$port = '53','80','88','443'
		$port | ForEach-Object {
				Test-NetConnection -ComputerName 172.30.5.10 -Port $_
		}
} | Select-Object Minutes,Seconds
As Figure 3 shows, the duration of sequential execution of this operation is 1:44 minutes.
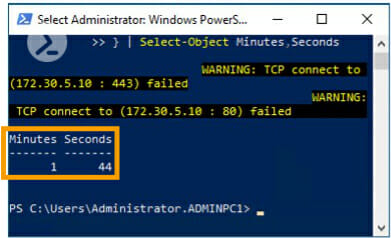
Figure 3: Sequential processing of a ForEach-Object loop in Windows PowerShell
In the second part, the operation is performed in PowerShell 7 and the parameter -Parallel is added:
# Parallel processing
Measure-Command {
		$port = '53','80','88','443'
		$port | ForEach-Object -Parallel {
				Test-NetConnection -ComputerName 172.30.5.10 -Port $_
		}
} | Select-Object Minutes,Seconds
As Figure 4 shows, the duration for parallel processing of this operation is only 15 seconds.
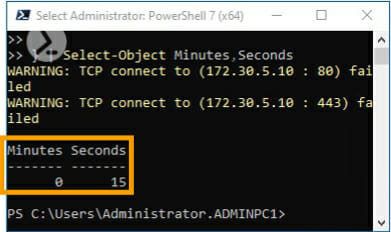
Figure 4: Parallel processing of a ForEach-Object loop in PowerShell 7
We’re showing more use cases where parallel processing is handy in our webinar “Automate successfully with PowerShell 7”
Error Handling in PowerShell 7: ConciseView and Get-Error Cmdlet
PowerShell 7 adds new options to the $ErrorView variable to make the display of error messages more user-friendly: In addition to the existing views (NormalView and CategoryView), the ConciseView provides a simplified error view.
In addition, the new Get-Error cmdlet provides a comprehensive detailed view of the error, including exceptions, stack trace, and so on.
Conclusion
Another way to learn about the most important new features is to attend the ScriptRunner webinar "Automate successfully with PowerShell 7" where you will not only learn about other new features and usage scenarios of PowerShell 7, but also how to use them in ScriptRunner.
Related posts
About the author:

Birgit Hettler is an Online Marketing & SEO Manager with a background in design. She's been working at ScriptRunner until August 2021.