.svg)
.svg)


Migrations of mailboxes from Exchange to Exchange Online are handled in two ways; either using the web interface of the Exchange Admin Center or using PowerShell to run the migration via scripts or one-liners. Either method is suited to that purpose, and most migrations will work perfectly well with either method.
While this may be true, Microsoft has put some limitations in place that can make for a sub-stellar experience for some migrations. For example, migration batches in the Exchange Admin Center are limited to 100 and for a large migration this restriction can be limiting depending on how batches are managed. Add to this the Admin Centers relatively inconsistent experience at times, using PowerShell to handle a migration could prove to be more efficient and responsive for an admin. For this two-part blog series, we will cover how to handle a migration from start to finish, including some prerequisite checks and reporting.
Prerequisite checking
Moving mailboxes to Exchange Online may be as simple as kicking off a new migration for the mailbox, however, for some organizations, there are legacy configurations or setups that can cause a mailbox move request to fail. We are talking about email domains that may make up a proxy address on a mailbox which are no longer needed, not defined as Accepted Domains in Exchange or configured in Exchange Online.
Another check that can be performed is the alignment of a mailboxs User Principal Name (UPN) and the Primary SMTP Address, as Microsofts guidance is that these two values should match. Each of these can be blockers to a move.
Additionally, Retention Policies and Litigation Holds could complicate the move process. Each of these can be documented pre-migration and configured post-migration with some forethought. Large emails can also cause heartburn for those migrating mailboxes, since Exchange Online has a 150 MB message size limit.
PowerShell scripting for migrations
When working with mailbox migrations, small or large, it is a good practice to batch them in such a way that users do not experience Permission issues, IT personnel can properly support day after migrations and the administrator can effectively keep track of all moves that are in flight.
Using CSV files with lists of mailboxes moves provides both a controllable size of mailboxes to move, and an easy reference set for the administrator to keep track of. For example, say we are moving mailboxes in batches of 25 to 50, these batch files, saved as CSV files, can contain a single header of PrimarySMTPAddress and then a list of mailbox email addresses to move, like so:
Pre-checks
1.UPN match
In this check, we take the SMTP address provided in the CSV file, query the mailbox for the UPN and compare the two values. If there is a mismatch, we can export this to a file or display them to the screen, or even do both. A logging file is ideal as we can refer to this file later. In the code sample below, we look for this and any mismatches are stored in a file for later analysis.
An oft asked question is why are we matching the UPN to a users Primary SMTP address?. Well, simply put, we are following Microsofts own recommendation for a better end user experience:
Microsofts recommended best practices are to match UPN to primary SMTP address.
Source: Configuring Alternate Login ID | Microsoft Docs
Remediation
We can also use PowerShell to remediate this issue if you wish to do so. This simple block of code will find the Primary SMTP address of a mailbox and change the UPN to match. It is CSV based:
2. mail.onmicrosoft.com domain check
Remove mailbox moves and mail routing rely on SMTP domains that are stamped on mailboxes on-premises. One key domain we need to confirm is .mail.onmicrosoft.com which, if missing, will prevent the mailbox from moving.
Remediation
Missing this one domain will stop a migration in its tracks. As such, we should get this address on the mailbox. How do we do this?
Your mailbox needs the required address. One caveat to this is that if a mailbox has this property (EmailAddressPolicyEnabled) set to True, this change will fail. Instead, you will need to run this:
3. Bad domain check
In order to migrate a mailbox to Exchange Online, it must not have an SMTP Domain that has not been verified with Exchange Online. If a mailbox is stamped with a domain that is not verified, the migration will also fail. First, we need to store a list of domains in a variable and check each maillboxs EmailAddresses property to make sure no other domains are listed. A code block like this should suffice:
Remediation
Any non-validated domain will stop a migration in its tracks, so how do we remove them? The easiest, and the most potentially destructive, is to do this:
This code block will identify any mailbox that has an SMTP Address with the baddomain.com domain and then removes any address that matches that domain. Be careful as this can cause issues if you depend on that domain for something. It may be useful to filter this if only certain mailboxes need that domain removed.
4. Retention and litigation holds applied
Some other checks we can perform are if a mailbox has a Retention Policy or litigation hold applied to it. For Retention Policies, we can decide to keep them or not apply the policy in Exchange Online. Litigation Hold has a different connotation for a mailbox and typical those need to be kept because there may be a legal requirement in place and the mailboxes will need a hold reapplied once in Exchange Online. We can identify the mailboxes like so:
5. Large items check
Exchange Online has an absolute large item limit of 150 MB and this means that if your mailbox contains items over 150 MB, you will not be able to move the mailbox to Exchange Online. On top of that, it might actually be smaller than that due to other factors that can affect the size of an email. It is suggested that you review mailboxes for items over 125 MB for analysis.
PowerShell script for executing prerequisite checks
In order to make a set of code more accessible to Admins that may or may not have as much PowerShell coding experience, we can create a GUI-like experience with PowerShell to run through the Prerequisite checks.
For example, if we make the script menu-driven, our PowerShell script can provide an experience where they just need to select which options to run. Additionally, we can output details to a CSV file that contain lists of users to check. If the script were to cover all aspects of a migration, then the menu might look something like this:

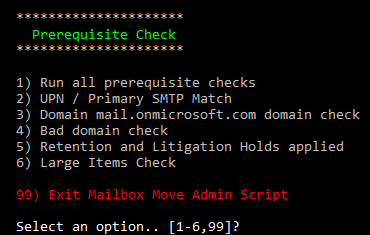
Note that we have a menu item for each major part of the move process: prerequisite checks, mailbox moves and reporting. For the Prerequisite submenu, we would then be able to shape the menu to include the prerequisite checks we covered in this article, like so:
And now we have a script that can be used to drive a migration for our mailbox moves from Exchange to Exchange Online.
Conclusion
That concludes our first part of the migration script. In this article we learned that even before we can migrate a mailbox, there are prerequisites that may need to be taken care of and even the above list is not necessarily 100%. Other configuration items that are outside the scope of mailbox moves themselves are:
- Recreating journal rules
- Creating OWA policies
- Configuring message limits
- Checking permissions and building appropriate batches
- Configuring Security See my article on PowerShell and Exchange Online Security for details
- and much more
Suffice it to say, this script is just one part of a larger project to make the move to Exchange Online easier. In the next article in the series, we will dive into creating new moves, suspending moves, removing moves and more. Also included will be a link to a functional script that you can use as a base for creating your own migration script.
Related links
- ScriptRunner ActionPacks will help you automate tasks
- Try out ScriptRunner here
- ScriptRunner: Book a demo with our product experts