.svg)
.svg)


PowerShell uses only a few .NET types natively to store data. In this series, we’ll explore other data types that are easy to use and can simplify a variety of tasks. Let’s begin by looking at better ways to store information.
By default, when you assign values to variables, PowerShell typically uses four .NET types: [string] for text, [int32] for whole numbers, [int64] for larger whole numbers, and [double] for fractional numbers. Here’s a simple experiment to confirm this:
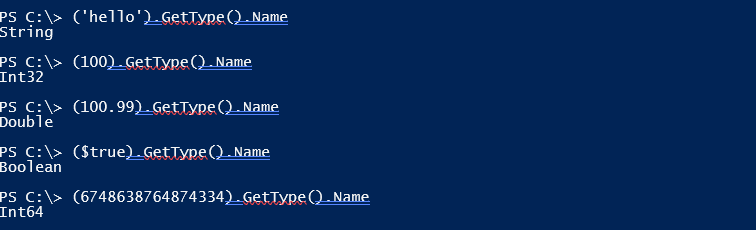
The reason for this selection is simple: scripts are made of text, and the only data you can express directly in text are numbers (0–9, interpreted as numeric values) and text enclosed in quotes (interpreted as strings).
However, if you tell PowerShell what your data actually represents, .NET data types can greatly simplify your work. Here are some useful .NET types worth exploring:
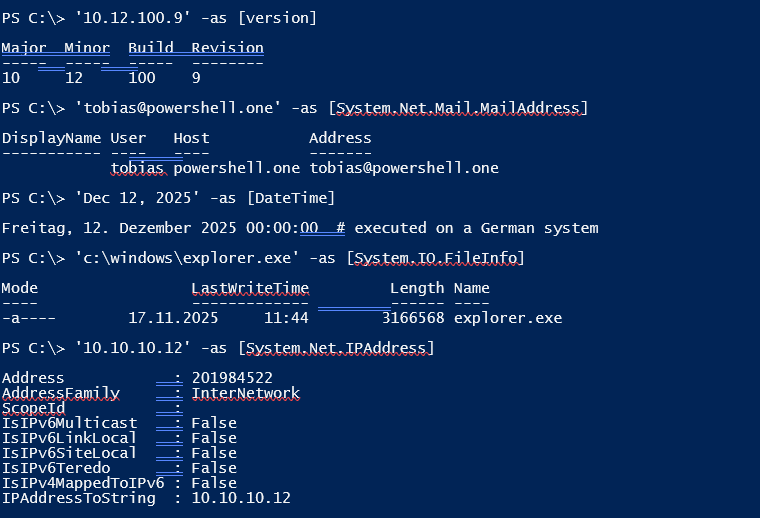
To use a more suitable type for your data, all you need is the -as operator. It automatically converts a value to the .NET type you specify. If the value can’t be converted, -as simply returns nothing.
Here are three benefits you immediately gain from using additional .NET types:
Parsing
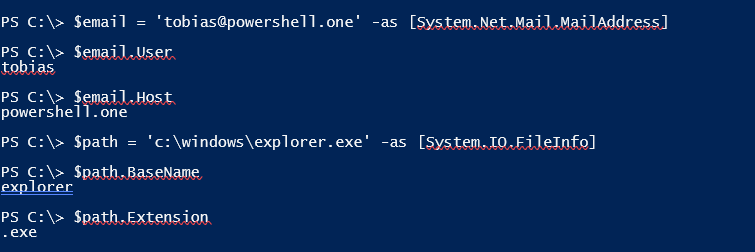
.NET types automatically parse data for you, so you don’t have to do it yourself:
Comparison
.NET types automatically respect the nature of the data they store, and PowerShell chooses the appropriate comparison algorithm for them.
Let’s assume your script deploys software and needs to check whether the existing version is older (lower) than the version you plan to deploy:

In the first example, PowerShell treats the version values as strings by default, which produces an incorrect result. Strings are compared character-by-character. By converting at least one side of the comparison to the appropriate .NET type, PowerShell understands what the values represent and performs the correct comparison.
You may also see code like this:

Instead of using the -as operator, you can also specify the desired type directly to the left of the value:

We’ll explore the subtle differences between these two approaches in the next part.
Verification
Because -as converts a value to the desired type only when the value actually matches that type, .NET types can serve as a simple way to validate input. For example, you may want to confirm that a user has entered a valid IP address. Doing this manually can be difficult:
do
{
    $ipAddress = Read-Host -Prompt 'Enter IP Address'
} until ($ipAddress -like '*.*.*.*')


Parsing a string leaves plenty of room for mistakes. A user could still enter something like “…” or “a.b.c.d”. You would need to dive into fairly complex regular expressions to verify this accurately:
do
{
    $ipAddress = Read-Host -Prompt 'Enter IP Address'
} until ($ipAddress -match '^(?:(?:25[0-5]|2[0-4][0-9]|[01]?[0-9][0-9]?)\.){3}(?:25[0-5]|2[0-4][0-9]|[01]?[0-9][0-9]?)$')
A much simpler approach is to let the .NET type handle the verification:
do
{
    $ipAddress = Read-Host -Prompt 'Enter IP Address'
} until ($ipAddress -as [System.Net.IPAddress])
You might be surprised that this approach now also accepts simple numbers. That’s because the .NET type can represent any IP address in any notation, not just IPv4. However, it’s now straightforward to add a basic pattern check and accurately verify IPv4 addresses:
do
{
    $ipAddress = Read-Host -Prompt 'Enter IP Address'
} until ($ipAddress -as [System.Net.IPAddress] -and $ipAddress -like '*.*.*.*')
Related links
- ScriptRunner ActionPacks will help you automate tasks
- Try out ScriptRunner here
- ScriptRunner: Book a demo with our product experts