.svg)
.svg)

How many times have you had to open up a web browser, log in to the portal, choose a service, click a bunch of buttons, and finally receive the information you were trying to retrieve on an AWS service? Perhaps the metadata on an EC2 instance? Now you can do it all automatically!
AWS has many Software Deployment Toolkits (SDK) available for anyone to use and that means the ability to automate the entire cloud platform with PowerShell. AWS PowerShell is a way for developers and administrators to take tasks that were once manual, and turn them into code. AWS PowerShell is also cross-platform, which means it can run on Windows, MacOS, and Linux, ensuring that any environment that you are in, AWS PowerShell is ready to automate.
In this blog post you will take a hands-on approach at diving right into the AWS PowerShell module. You will learn not only the cmdlet reference, but how to install AWS PowerShell, authenticate to AWS from PowerShell, and start working with services in AWS using PowerShell.
Prerequisites
To follow along with this blog post from a hands-on perspective, you will need the following:
- An AWS Account. If you do not have one, you can sign up for a free tier aws account.
- A beginner-level knowledge of PowerShell. If you need a PowerShell reference, check out PowerShell for Sysadmins.
First Look at the AWS PowerShell Cmdlets
The AWS PowerShell module was created by AWS in an effort to help engineers automate creating, modifying, and listing AWS services, like EC2 instances for example. The cmdlets are in a standard Verb-Noun flow as you would already assume per the PowerShell best practices for module creation.
To you as a user, the AWS PowerShell cmdlets are exposed, but on the backend they are using various AWS service HTTP queries for API calls (GET, POST, etc.). The PowerShell module is built on the functionality exposed from the AWS SDK for .NET Core, which is how the PowerShell module is cross-platform.
Lets take a look at an example of the PowerShell cmdlets. Below you will see an example of starting an EC2 instance.
Start-EC2Instance -InstanceId i-12345678
Another example is receiving an S3 bucket in an AWS account.
Get-S3Bucket -BucketName testbucket
As you can see, by cmdlet names its understood what the cmdlet is doing, which makes using the PowerShell module much easier from a readability perspective.
Installing the AWS PowerShell Module
In the previous section you got a first look at the PowerShell cmdlets and what the cmdlets do. In this section youll learn how to install the AWS PowerShell module on Windows 10 and MacOS.
Windows 10
To install the PowerShell module on Windows 10, there are two primary methods.
The first option would be to use the Install-Module cmdlet, which installs PowerShell modules. To use the Install-Module method, run the following command.
Install-Module -Name AWS.Tools.Installer
The second option on Windows 10 would be to use chocolatey, which is a package manager for Windows. To use chocolatey to install the AWS PowerShell module, you will need to ensure chocolatey is installed. You can find instructions on chocolatey.org/install.
Once chocolatey is installed, you can open up PowerShell and run the following line.
choco install awstools.powershell
Once the AWS Tools module is installed, you can run the following cmdlet to install the specific tools you want to use in PowerShell.
Install-AWSToolsModule
For example, if you want to install the S3 Tools, run the following:
Install-AWSToolsModule AWS.Tools.S3
MacOS
To install the AWS PowerShell module on MacOS and have the ability to use it, ensure PowerShell Core is installed. To install PowerShell Core, visit the following Github page or use Homebrew, which is a package manager for MacOS.
There is one primary option for installing the AWS PowerShell module on MacOS, which is to use Install-Module and Install-AWSToolsModule cmdlets like we saw in the Windows 10 section.
Authenticating with the AWS PowerShell Module
In the previous section you learned how to install the AWS PowerShell module on Windows 10 and MacOS. Now that it is installed, its time authenticate to AWS with PowerShell.
To authenticate, the primary method is by using AWS credentials. Each cmdlet used in the AWS PowerShell module includes a set of AWS credentials, which are cryptographic signatures corresponding to the service you are interacting with in AWS.
The credentials are set in one primary place, depending on the operating system.
On Windows 10:
C:<.aws
On MacOS:
~/.aws/credentials
Adding a New Profile
Before being able to add a new profile, you need an access key and secret key. To create these values using AWS IAM, follow this tutorial.
To add a new AWS credentials profile using PowerShell, open up a PowerShell window and run the following cmdlet.
Set-AWSCrednetial -AccessKey access_key_value -SecretKey -secret-key-value -StoreAs name_to_store_creds_as
Creating an S3 Bucket with AWS PowerShell
Now that you know how to authenticate to AWS using PowerShell on both Windows and MacOS, its time to start creating some resources. Creating resources in AWS PowerShell can be a PowerShell function, advanced function, or simply a one-liner. Lets take a look at how to create an S3 Bucket using AWS PowerShell.>
The first thing you will need to do is open up a PowerShell window.
After the PowerShell window is open, run the following cmdlet to create an S3 bucket
New-S3Bucket -BucketName mynewbucket92 -Region us-west-2
You will now see from the screenshot below that the new S3 bucket has been successfully created.

Fig. 1: the new S3 bucket mynewbucket92 has been successfully created
If you open up a web browser and go to the S3 buckets, you will now see the S3 bucket listed (figure 2).
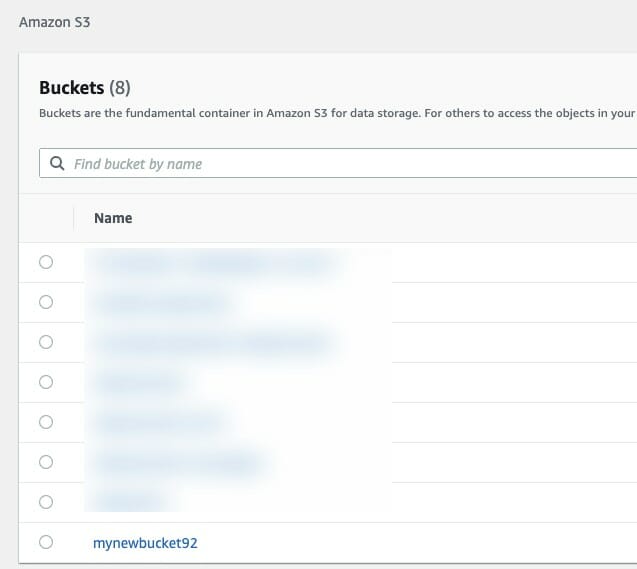
Fig. 2: mynewbucket92 is listed in the Buckets list
Listing An S3 Bucket With AWS PowerShell
Now that you have an S3 bucket created, what if you want to list that S3 bucket for reading purposes? To check on the name or the properties, for example. In this section you will learn the cmdlet.
Open up a PowerShell terminal to list the AWS bucket via PowerShell.
In the terminal, run the following command to retrieve the properties of the mynewbucket92 S3 bucket.
Get-S3Bucket -BucketName mynewbucket92
As shown in figure 3 below, you can now see the S3 bucket properties listed.

Fig. 3: Bucket properties in PowerShell
Conclusion
In this blog post you learned the top five tips on getting started with utilizing the AWS PowerShell module to interact with and create resources in AWS. You first learned about the cmdlets and how they are structured, then moved into installing the PowerShell module for AWS. After the module was installed, you authenticated to AWS via PowerShell. Finally, you created an S3 bucket and listed the bucket to see its properties.
Related links
- ScriptRunner ActionPacks will help you automate tasks
- Try out ScriptRunner here
- ScriptRunner: Book a demo with our product experts