


7 min read
New ScriptRunner Release Enhances Enterprise IT Automation with Better Security, Transparency and Efficiency
The latest ScriptRunner release enhances Enterprise IT automation with three powerful features: the new Approval Process
ScriptRunner Blog
Code review and software unit tests are not the most popular tasks in code development and PowerShell DevOps are not spared. Still, when you’re writing a function or a script to perform a specific task, it’s essential to know whether your script does what it’s supposed to do.
With the Pester framework for PowerShell testing and mocking, this task becomes less time-consuming and annoying. Pester provides a language for writing unit and integration tests for your PowerShell scripts, cmdlets, functions and modules. And as we are used to from PowerShell, these tests can be easily automated.
In this article you will learn how to get started with Pester as well as the basics of using Pester to test your scripts.
Get-Module -ListAvailable PesterDirectory: C:\\Program Files\\WindowsPowerShell\\Modules
ModuleType Version Name ExportedCommands
---------- ------- ---- ----------------
Script 5.0.4 Pester {Invoke-Pester, Describe, Context, It...}Update-Module -Name PesterInstall-Module Pester -ForceImport-Module PesterGet-ModuleUse these commands to connect to Office 365 tenant:
$Credentials = Get-Credential
Connect-ExchangeOnline -Credential $Credentials
You have a csv file with the list of the users on whom you need to perform your tasks. The first aim would be to ensure that the path that’s provided does actually exist. Let’s create a test to verify that.
Describe "Test-CSV" {
It "CSV exists" {
"" | Should -Exist
}
}
If the file exists in the said location, then the output should resemble this:
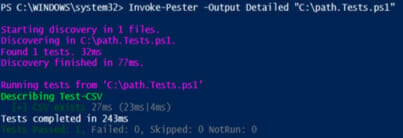
Fig. 2: Successful path test
There are quite a few things happening here. First thing is, we used the Invoke-Pester command to start the Pester test. This is the way to call upon a test.
The next part is to discover the test file on the given location. Pester tests have this format “filename.tests.ps1″.
Tip: ScriptRunner automatically recognizes Pester tests by their file format. The corresponding test scripts are automatically filed in the “Pester Tests” sublibrary of the ScriptRunner Admin App.
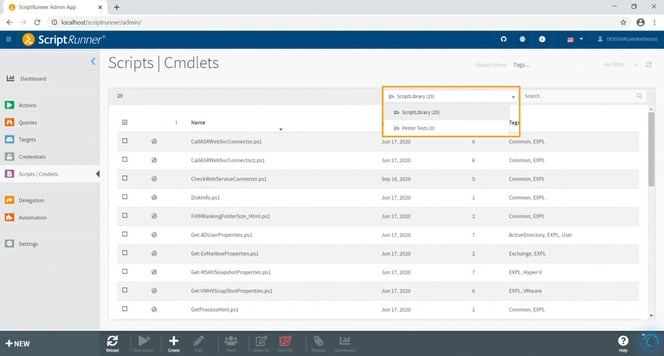
ScriptRunner automatically sorts Pester scripts in the “Pester Tests” sublibrary.
Once the file is found it would check the number of conditions given and then perform the test. The test result is then displayed at the bottom.
In this case, I had created the file at the location mentioned; hence, my test was successful. However, if the file isn’t found at that location, the output would be as shown in figure 3:
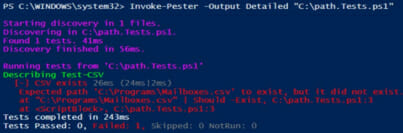
Fig. 3: Unsuccessful Path Test
The other aspects of this test are the ‘Describe’ and ‘It’ blocks. You will read more about them in the next section.
Describe serves as a group of tests. You can add multiple Describe blocks in your test.
Here’s an example: We will build upon the following script over the course of this article. I have also included the script in its final form later in this post.
function Get-UsageLocation ($User){
return (Get-Mailbox $User).UsageLocation
}
Describe "Retrieve Mailbox Information" -Tag 'MailboxInfo' {
It "Check if India" -Tag "India" {
Get-UsageLocation "yogi@testdomain1988.onmicrosoft.com" | Should -Be "India"
}
It "Usage location should not be UK" -Tag "NotUK" {
Get-UsageLocation "derek@testdomain1988.onmicrosoft.com" | Should -Not -Be "United Kingdom"
}
}
You would be testing two possibilities using Describe. The mailbox “derek@testdomain1988.onmicrosoft.com” has usage location as “United Kingdom”; hence the test will fail in the 2ndIt block.
The 2nd It block had the condition that the usage location must not be “United Kingdom”.
The result of the test can be one of the following:
In our example the 1st It block test passed, whereas the 2nd one failed (figure 4).

Fig. 4: It block test output
The Context block will exist within the Describe block. There can even be multiple Context blocks in one Describe block: As the name suggests, you could use them to divide your tests in different contexts.
In the example here, you will notice that I have added 2 Context blocks to differentiate between the tests for usage location and address book. Here’s the code:
Context "Check Usage Location" {
It "Check if India" -Tag "India" {
Get-UsageLocation "yogi@testdomain1988.onmicrosoft.com" | Should -Be "India"
}
It "Usage location should not be UK" -Tag "NotUK" {
Get-UsageLocation "derek@testdomain1988.onmicrosoft.com" | Should -Not -Be "United Kingdom"
}
}
#end of usagelocation context
Context "Is it hidden from the address book" -Tag HiddenFromGAL {
It "Check hidden from GAL attribute" {
Get-HiddenFromGal "vignesh@testdomain1988.onmicrosoft.com" | Should -Be "False"
}
} #end of Hidden from GAL context blockThis block is run before any of the It blocks.
You can now add the functions within the BeforeAll block as shown here:
BeforeAll {
#Connecting to Exchange Online PowerShell Module
. #Functions
function Get-UsageLocation ($User){
return (Get-Mailbox $User).UsageLocation
}
function Get-HiddenFromGal ($Account){
return (Get-Mailbox $Account).HiddenFromAddressListsEnabled
}
}
Running the test now clearly shows that its functioning as expected (see figure 5).
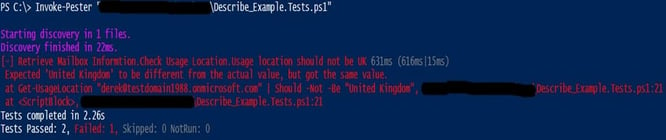
Fig. 5: BeforeAll test output
Adding the following code block at the end of the last It block will ensure that the Exchange Online PowerShell session is disconnected after the tests have run:
AfterAll{
Disconnect-ExchangeOnline -Confirm:$false
}In the example that we have been building on in this session, I have used the BeforeEach and AfterEach blocks to show a text in the result:
BeforeEach {
Write-Host "BeforeEach Block" -BackgroundColor DarkMagenta
}
AfterEach {
Write-Host "AfterEach Block" -BackgroundColor Black
}
Feb 24, 2025 by Heiko Brenn
The latest ScriptRunner release enhances Enterprise IT automation with three powerful features: the new Approval Process
Jan 28, 2025 by Jeffery Hicks
Changelogs keep your software updates clear and organized. Learn the best practices for creating and managing them in...
Dec 19, 2024 by Jeffery Hicks
Boost IT efficiency with Winget and PowerShell! Learn how to automate app installations, updates, and management...
Vignesh hails from the city of Pune in India. He has been working in cloud for the past 10 years. He works in the areas of Exchange servers, Exchange Online, MS Teams, Office 365 security, PowerShell and reviewing the latest Office 365 features and apps.