.svg)
.svg)

How familiar are you with the pipeline? We are launching a new, short series starting with the topic of PowerShell pipeline basics.
Introduction don't be afraid of the pipeline!
For many administrators, the pipeline functionality in PowerShell appears to be unknown territory that they often bypass despite its enormous potential. Even if at least the basics are known, many prefer not to use it independently and instead rely mainly on copied code. In fact, the application is less complex in practice than often assumed and it becomes almost intuitive after a short time to get familiar with it.
Pipelining enables several cmdlets to be linked seamlessly, which means that even complex tasks can be simplified. This article answers the following questions:
- What are the basics and basic functionality of pipelining?
- How can you filter and sort data and objects individually using the pipeline?
- How do you find out which cmdlets can be combined with the pipeline?
- How do you make your own functions pipeline-ready?
Basics of the PowerShell pipeline
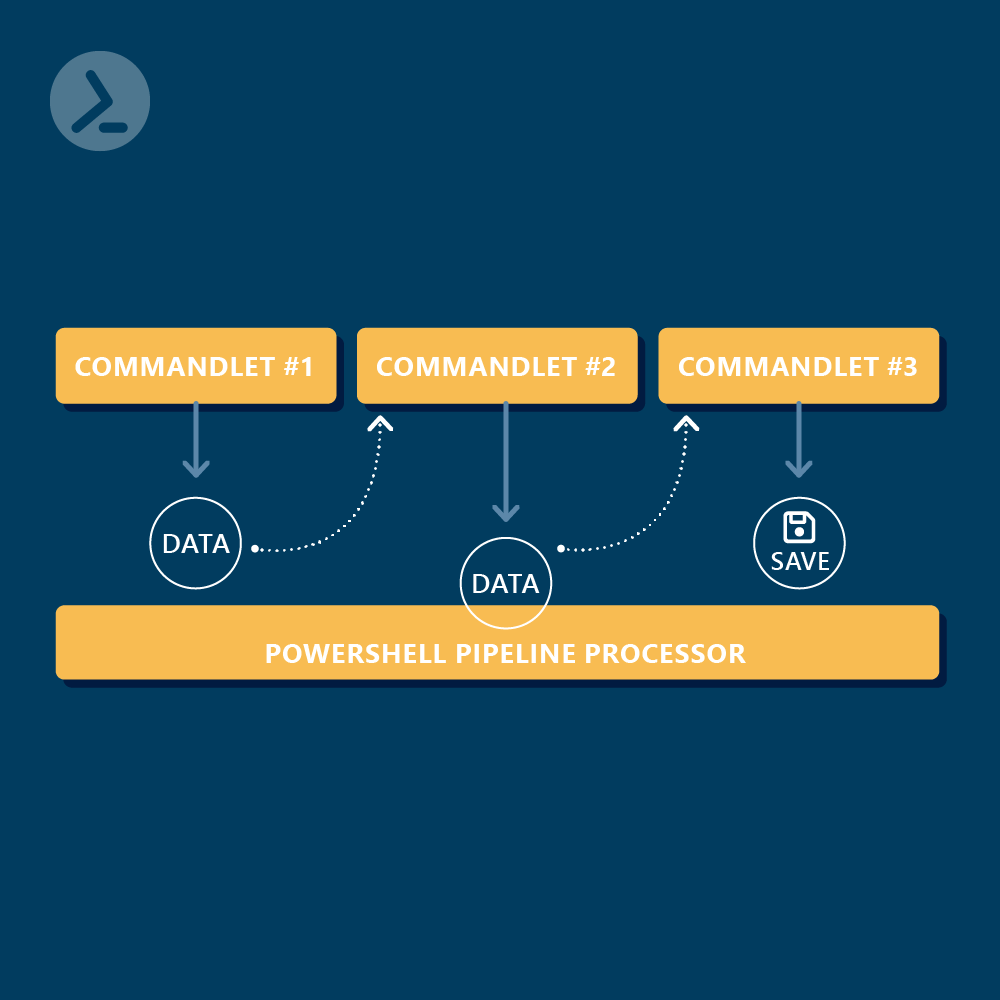
The pipeline makes it possible to chain two or more cmdlets. The results of one command are passed on to the next command. The vertical line (" | ") is used to link the commands. Some people are familiar with this procedure from the Linux bash. PowerShell differs from the bash pipe in that complete objects can be passed in PowerShell instead of just "dumb" text.
Think of the PowerShell pipeline like an assembly line in a factory. Each cmdlet is like a station on this assembly line. You place a product (e.g. a data object) at the beginning of the conveyor belt and it moves from station to station. At each station (cmdlet), a special action or processing is performed on this product before it is passed on to the next one. When it reaches the end of the assembly line, you have a finished product that has gone through all the necessary processing steps. Just like in a factory, you can add as many stations (cmdlets) as required in the desired sequence to achieve the perfect result.
The following code example illustrates the use of the PowerShell pipeline:
Get-Service -Name 'wuauserv' | Stop-Service
First, a service object with the name "wuauserv" is queried. The result of this query (= the service object) is now passed on to the next cmdlet using the pipeline. Stop-Service now stops all service objects that were passed on via the pipe (in this case the "wuauserv" service object).
Linking several cmdlets is much more exciting. You could use a filter to first search for specific services and then terminate them. Assuming that all services of a certain application (in this case "Xbox") are to be terminated, the following concatenation could be used:
Get-Service | Where-Object Displayname -like "*xbox*" | Stop-Service
Important pipeline cmdlets
As already shown in the last code example, it is possible to use the pipeline for filtering, sorting and forwarding data. The most important cmdlets for this are:
- Where-Object
- Sort-Object
- Select-Object
- Group-Object
- Tee-Object
- Foreach-Object
Filtering with Where-Object
The cmdlet Where-Object is like a sieve that only lets the desired objects through. For example, if you want to list all services on your system but only see those that are currently running, you can use the following code:
Get-Service | Where-Object { $_.Status -eq 'Running' }
Of course, more complex queries can also be carried out using Where-Object, as in this example:
Get-ChildItem -Path 'C:\Logs' -File | Where-Object { $_.Extension -eq '.log' -and $_.Length -gt 1GB }
In this case, all files in the "C:\Logs" folder that fulfil both of the following conditions are output:
- .log as file extension and
- file size over 1GB
Sorting with Sort-Object
The cmdlet Sort-Object sorts the data accordingly. This allows you to sort the output of an object based on a selected attribute - in the following example, we filter all services based on the respective status and then sort based on the process name. The -Ascending (ascending) and -Descending (descending) parameters can be used to specify the order:
Get-Service | Where-Object { $_.Status -eq 'Running' } | Sort-Object Name -AscendingGet-Service | Where-Object { $_.Status -eq 'Running' } | Sort-Object Name -Descending
Selecting with Select-Object
The cmdlet Select-Object is a useful tool if you want to extract specific properties from the objects flowing through the pipeline. It is particularly helpful if you only want to display or process certain data. Here is a simple use of Select-Object to get only the names and states of the services running on a system:
Get-Service | Select-Object Name, Status
Grouping with Group-Object
The cmdlet Group-Object allows you to group objects by one or more properties. This is particularly useful if you have a large amount of data and want to divide it into logical groups. Here is an example where Group-Object is used to group services according to their status:
# Command: Get-Service | Group-Object -Property Status# Output:
In this code block, the services are grouped according to their status and an output is obtained showing how many services are available in each status (Running, Stopped, etc.).
Forwarding with Tee-Object
The cmdlet Tee-Object is useful if you want to display the pipeline data on the screen as well as write it to a file. It forwards the data to two locations - hence the name "Tee" (like a T-junction). Here is an example:
Get-Process | Tee-Object -FilePath "C:\temp\processlist.txt"
In the above code block, the process information is both displayed on the screen and written to the specified file.
Iterating with Foreach-Object
The cmdlet Foreach-Object makes it possible to perform an action or a group of actions for each object in the pipeline. This is particularly useful when you want to perform a specific task for each object in a list. Here is an example:
Get-Service | Foreach-Object { if ($_.Status -eq 'Running') { Write-Output "$($_.Name) is running and its start type is $($_.StartType)" } }
In this example Foreach-Object is used to iterate through all services. If the status of a service is "Running", an output is generated that specifies the name of the service and its start type.
Which cmdlets can be concatenated?
Now that you know how cmdlets can be concatenated/linked, you are probably wondering how you can find out which cmdlets are "compatible" with each other.
In principle, cmdlets can be concatenated/linked if the output object of the first cmdlet is accepted by the second cmdlet as an input object. This happens either ByValue or ByPropertyName.
Pipelining ByValue
Cmdlets directly accept the value of the output object (OutputObject) of the previous cmdlet as the InputObject, as shown in the following example:
Get-Service wuauserv | Stop-Service
To determine the type of the OutputObject of a cmdlet, you can proceed as follows:
The output tells us that Get-Service returns the object type System.ServiceProcess.ServiceController. It represents a controller via which the underlying service can be addressed and controlled.
To check which object types are expected by Stop-Service, we can proceed as follows:
# Command:Get-Help Stop-Service -Parameter InputObject# Output:
The parameter -InputObject for the cmdlet Stop-Service expects an input value of the type System.ServiceProcess.ServiceController[]. This means that Stop-Service accepts a collection (an array) of ServiceController objects. The "Accept pipeline input? true (ByValue)" part is important here. This means that Stop-Service accepts this input directly from the pipeline if it corresponds to the expected type (Service).
We therefore know that we can chain both cmdlets and that Stop-Service supports the ServiceController objects (ByValue).
Pipelining ByPropertyName
The pipeline transfer "ByPropertyName" is another type of chaining. Here, the input for a cmdlet is not determined on the basis of the type of the transferred object, but on the basis of the name of a property or a parameter of the object.
Here is a simple example:
'wuauserv'| Stop-Service
In this example, the name of the service is transferred from the cmdlet Get-Service to Stop-Service. The cmdlet Stop-Service normally requires the service name as input in order to stop a service.
To find out whether a cmdlet accepts the "ByPropertyName" input, we can use the following command:
# Command:Get-Help Stop-Service -Parameter Name# Output:
Here we can see that the -Name parameter for the cmdlet Stop-Service expects an input of the type String[] and that it accepts the input from the pipeline based on the name of the property (see "Accept pipeline input? true (ByPropertyName)").
This means that if the object passed from the pipeline has a property called "Name" (which is the case with Get-Service), then this cmdlet can use the value of this property.
In practice, we should always check the documentation to make sure that the expected inputs and the actual outputs of a cmdlet match before chaining them in a pipeline. It is also important to note that many cmdlets can support both "ByValue" and "ByPropertyName", depending on the data provided and the expected inputs.
Cmdlets are often designed to be compatible with similar cmdlets in their "category" or module. For example, many Active Directory cmdlets that output User objects can be combined in a pipeline with other Active Directory cmdlets that use User objects as input.
Finally, effective use of the pipeline in PowerShell also requires some experimentation and experience. It can be helpful to play with different cmdlets and see how they interact with each other in practice.
Conclusion
The pipeline functionality in PowerShell is a powerful tool for administrators and provides an efficient way to simplify and automate various tasks. The key to understanding and successfully using it lies in the consistent examination and practice. Once mastered, working with the PowerShell pipeline will not only increase efficiency, but also open up the possibility of creating customised solutions and functions tailored to individual needs.
Your ultimate PowerShell Cheat Sheet
Unleash the full potential of PowerShell with our handy poster. Whether you're a beginner or a seasoned pro, this cheat sheet is designed to be your go-to resource for the most important and commonly used cmdlets.
The poster is available for download and in paper form.
Related links
- ScriptRunner ActionPacks will help you automate tasks
- Try out ScriptRunner here
- ScriptRunner: Book a demo with our product experts