.svg)
.svg)

For some background, in Exchange Online (EXO V2), there are two types of Quarantines for email messages that are delivered to a tenant: Admin/System level Quarantine and End User Quarantine. The reason for this is that messages that are determined to be more malicious or dangerous to an end user, are placed in the System Quarantine for examination of the tenant Administrators. Emails that are not considered highly malicious and are simply spam, bulk mail, or other questionable message types, end up in the End Users Quarantine for review by that user. While these levels existed, an Administrator did not have any sort of control on what might end up in each Quarantine type. This is where Quarantine Policies come into place.
Traditionally, an end users access to their Quarantine has been rather static and there were no granular controls that could be put in place for what actions an end user could perform in their own Quarantine. Now we have the concept of Quarantine Policies to provide some level of granularity to the experience. We can work with Quarantine Policies in either the Security Center (security.microsoft.com) or with PowerShell using the Security and Compliance Center PowerShell Module.
In order to use Quarantine Policies properly, we need to know how they fit into the whole experience and what needs to be configured after a Quarantine Policy is created. As we can see below, a Quarantine Policy is referenced by an AntiSpam Policy which is applied like an Access Control List (ACL) for a user accessing Quarantine emails:
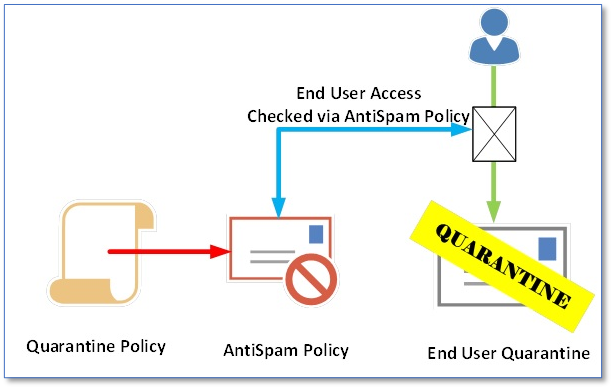
End user access checked via AntiSpam Policy
PowerShell Different Cmdlet Groups
To configure Quarantines for a tenant's end users using PowerShell, we need to work with two different cmdlet groups with one controlling the Quarantine Policy settings and the other to choose how these Quarantine Policies are applied to AntiSpam Policies. Both sets of cmdlets can be accessed in Exchange Online (EXO V2) PowerShell, so make sure you have the latest EXO V2 cmdlet installed you can find it in Microsofts PowerShell Gallery: Exchange Online EXO V2 packages for download.
Quarantine Policy
Get-QuarantinePolicyNew-QuarantinePolicyRemove-QuarantinePolicySet-QuarantinePolicy
With these cmdlets, we can begin to construct our Policies and how they will impact end users Quarantine experience. Where should we begin? Well, each Policy will have a litany of required values to fill as well as non-required ones that should also be configured. Let's walk through these parameters:
Required Parameters
Name: Only required property, make sure to name it something that matches its purpose.
Recommended Properties
EndUserSpamNotificationFrequencyInDays: With a provided range of 1 to 15 days, a set cadence will allow the users to be notified of their Quarantined messages.
QuarantineRetentionDays: Valid values range from 1 to 30 and while 30 days is recommended, this can be shortened if necessary.
EndUserQuarantinePermissions: Choose what permissions users an end user has to their quarantined messages.
Additional Parameters Environmental Dependencies
EndUserSpamNotificationLanguage: If we need to set a language other than the Default, we can use this property.
CustomDisclaimer: Setting this will override the Disclaimer from the Global Settings.
Creating a Quarantine Policy or Policies
In order to illustrate how Quarantine Policies could be used in a tenant, lets take a scenario where we need to create two different types of Quarantine Policies with one to apply with full rights to members of the IT team, and another that has restricted rights for most other users. For both new Policies, we will keep the language the same (default), the notification frequency the same (1 day), the Quarantine Retention (30 days) and after this, the Policies will diverge. The CustomDisclaimer property will be configured for the IT Policy to let IT know their policy is custom to their department and we will also have different permissions for the two Policies. To properly configure the Policy permissions, it is worth while reading Microsofts Docs (Quarantine Policy Permissions) on this as it does take some understanding to configure it properly.
For the IT Quarantine Policy, we would want them to have full access or all permissions assignable. Reviewing the chart, we need to also make sure that we only grant PermissionToRelease and not PermissionToRequestRelease at the same time. As that is the only exclusion, we would use a chart like this for permissions:
Combining all these values, the binary equivalent is 11110111, which can be converted into 247 for decimal. For the other Policy, we wish to limit features and force the users to Request releases and thus their permissions would look like this:
Combining all these values, the binary equivalent is 00011011, which can be converted into 27 for decimal. Now that we have both Permission values, lets create the two Policies:
IT Quarantine Policy
New-QuarantinePolicy -Name 'IT Quarantine Policy' EndUserSpamNotificationFrequencyInDays 1 -QuarantineRetentionDays 30 EndUserQuarantinePermissionsValue 247 -CustomDisclaimer 'This Quarantine Policy is for the IT department only. No Restrictions are applied.'
User Quarantine Policy
New-QuarantinePolicy -Name 'Corporate Quarantine Policy' EndUserSpamNotificationFrequencyInDays 1 -QuarantineRetentionDays 30 EndUserQuarantinePermissionsValue 27
Global Quarantine Policy Settings
Quarantine Policies also contain some global settings as we see in the Security Admin Center. However, these settings are not revealed in the default or custom Quarantine Policies that we create. How do we access these settings via PowerShell? With a bit of research, we find that Microsoft has a Microsoft Docs page on Quarantine Policies and theyre adding documentation for these settings. We need to run this special one-liner, which references the GlobalQuarantinePolicy (which is not visible by just running Get-QuarantinePolicy):
Get-QuarantinePolicy -QuarantinePolicyType GlobalQuarantinePolicy
This reveals Quarantine Policy Quarantine Settings:
If the Policy is hard to reveal, is it hard to make changes to? Yes and no. First, we need to make sure we have the correct value for the Policy which can be copied from Identity. Next, make sure to use the MultipleLanguage* parameters, these are only for the Global Quarantine Policy. If we wish to adjust the Global Settings, we can use a one-liner like this:
Set-QuarantinePolicy -Identity 'DefaultGlobalTag' -OrganizationBrandingEnabled $True -MultiLanguageCustomDisclaimer 'Before releasing an email from Quarantine, be sure to verify the sender is authentic.' -MultiLanguageSetting Default -MultiLanguageSenderName 'Office 365 Quarantine'
If we need to add more languages, we can do so like this (adding German for example):
NOTE: According to Microsoft that 'Language count, custom disclaimer count and sender count must be equal.'
Set-QuarantinePolicy -Identity 'DefaultGlobalTag' -OrganizationBrandingEnabled $True -MultiLanguageCustomDisclaimer 'Before releasing an email from Quarantine, be sure to verify the sender is authentic.','Bevor Sie eine E-Mail aus der Quarantäne freigeben, vergewissern Sie sich, dass der Absender authentisch ist.' -MultiLanguageSetting Default,German -MultiLanguageSenderName 'Office 365 Quarantine','Office 365 Quarantäne' -WhatIf
Keep in mind that with the OrganizationBrandingEnabled property, when this is configured for $True, then the logo that is configured in the Microsoft 365 Admin Center, will be used for any custom end use notification emails. Now that we have custom Quarantine Policies and Global Quarantine Settings configured, we can apply these to end users in our AntiSpam Policies.
AntiSpam Policies
Stage two of applying Quarantine Policies to end users is to modify or create new AntiSpam Policies with which to add the Quarantine settings, too. In PowerShell, we have these four cmdlets that we can use to manage the AntiSpam Policies:
Get-HostedContentFilterPolicyNew-HostedContentFilterPolicyRemove-HostedContentFilterPolicySet-HostedContentFilterPolicy
Prior to this upgrade, AntiSpam Policies had few settings that could be modified in relation to an end user's Quarantine like quarantine retention, end user notifications and that was really it. Now we can create Quarantine Policies and apply them to different message types within the end users Quarantine. For these Quarantine Policies to be effective, we need to change settings on an Anti-Spam Policy.
NOTE: Some confusion may be introduced here as we are applying Quarantine Policies to properties on the AntiSpam Policies called 'QuarantineTag'. The confusion comes from a change in nomenclature that Microsoft put in place where there were Quarantine Policies and Tags.
Get-HostedContentFilterPolicy 'Default' | fl *tag
This cmdlet produces these results:
In a Greenfield environment, there are two more Microsoft Provided AntiSpam Policies, a Standard and Strict Policy, as shown below:
The Standard Preset Security Policy has these Quarantine Policy settings:
While the Strict Preset Security Policy contains these Quarantine Policy settings:
One commonality between these two policies is that the HighConfidencePhishQuarantineTag is set to AdminOnlyAccessPolicy and the HighConfidenceSpamQuarantineTag, PhishQuarantineTag, and BulkQuarantineTag all set to NotificationsEnabledPolicy.
Example
In our previous example, we created two new Quarantine Policies for a tenant. Now we can use these and some existing Quarantine Policies and apply them to either an existing AntiSpam Policy or a new AntiSpam Policy. With the Users Quarantine Policy, we will apply this new one to the default AntiSpam Policy and for the IT Quarantine Policy, we will create a new AntiSpam Policy to isolate it to the IT Department. First, what is the default AntiSpam Policy?
We also know that there are five places where we can set the appropriate Quarantine Policy. First, we create the Corporate AntiSpam Policy, using the Corporate Quarantine Policy for most tags:
New-HostedContentFilterPolicy -Name 'Corporate AntiSpam Policy' -SpamQuarantineTag 'Corporate Quarantine Policy' -HighConfidenceSpamQuarantineTag 'Corporate Quarantine Policy' -PhishQuarantineTag 'Corporate Quarantine Policy' -HighConfidencePhishQuarantineTag 'AdminOnlyAccessPolicy' -BulkQuarantineTag 'Corporate Quarantine Policy' -HighConfidenceSpamAction Quarantine -BulkSpamAction Quarantine -HighConfidencePhishAction Quarantine -PhishSpamAction Quarantine -SpamAction Quarantine
NOTE: All 'Actions' were set to Quarantine as well, otherwise applying a Quarantine Policy would not work.
Next, we create a new custom IT AntiSpam Policy:
New-HostedContentFilterPolicy -Name 'IT AntiSpam Policy' -SpamQuarantineTag 'IT Quarantine Policy' -HighConfidenceSpamQuarantineTag 'IT Quarantine Policy' -PhishQuarantineTag 'IT Quarantine Policy' -HighConfidencePhishQuarantineTag 'IT Quarantine Policy' -BulkQuarantineTag 'IT Quarantine Policy' -HighConfidenceSpamAction Quarantine -BulkSpamAction Quarantine -HighConfidencePhishAction Quarantine -PhishSpamAction Quarantine -SpamAction Quarantine
In order for this Policy to apply to only the IT Department, we need to create a Hosted Content Filter Rule that references this Policy:
New-HostedContentFilterRule -Name "IT AntiSpam Rule" -HostedContentFilterPolicy "IT AntiSpam Policy" -SentToMemberOf itdepartment@practicalpowershell.com
Now we have a working Quarantine Policy and AntiSpam Policy for the IT Department and all users in the Organization.
Caveats
While all options appear to be available when configuring the AntiSpam Policy, there are changes that are occurring that will limit what is configurable:
Conclusion
When working with the new Quarantine Policies, an organization should try to keep it simple. There are many options for the Quarantine Policies and potential scenarios for what types of emails to apply a Quarantine Policy to. As such, it is best to come up with a Policy to Scenario mapping for each group of users (if Policies are broken down to groups of users). Assign the least number of permissions to most users so that they will be able to view messages in their Quarantine and at least be able to ask for an email to be released. Some more advanced users can be assigned greater permissions and the IT department should be able to assign itself most if not all permissions. Once these are in place, make sure to create or configure the appropriate AntiSpam Policy, which is scope to the user base that the Quarantine Policy was designed for. Lastly, make sure to make proper documentation of this in case Help Desk receives questions from the end users.
Related links
- ScriptRunner ActionPacks will help you automate tasks
- Try out ScriptRunner here
- ScriptRunner: Book a demo with our product experts