.svg)
.svg)

With Microsoft 365 and Sensitivity Labels, you are one step ahead. Protecting an organizations information from theft and other malicious attacks can be an important task for an organization to tackle. Microsoft's Labelling feature allows for protection of this information either on internal systems, Microsoft 365, or when it is shared externally. These Labels can provide encryption, copy, and other protection controls to act as safeguards of the information. With native app support, Labels can be unobtrusive and protective at the same time. Labels are a complicated topic and can require some substantial planning to get a good starting point for deploying to an organization.
Microsoft provides a PowerShell module that can be used as another management tool for this Microsoft 365 feature, which can also be paired with the GUI, which can be found in the Microsoft Purview Compliance portal (here), under Information Protection, for a total management solution:

Frame of Reference
There is an order of operations when it comes to Labels and we need to be aware of these parts so that we can create, apply, and manage Labels properly. The first and center element are the Labels themselves. We need to have a Label created prior to performing any other steps. Once we have a Label, we need to create a Label policy that will publish one or more Labels to users in an organization, or we create an auto-Labelling policy which can apply Labels to content based on defined criteria. On top of this, we need a Policy Rule (or AutoLabelling Policy Rule) that determines who the Labels are published to.
Label -> Policy -> Rule
AutoLabelling: An automated, machine logic driven process by which Sensitivity Labels are applied to content in a tenant, be it in SharePoint, OneDrive, or Exchange emails. This complex topic is outside the scope of this article where we cover Label basics.
Why PowerShell?
Microsoft has steadily eased the process of creating Labels and enhanced the user experience when managing Labels. We have seen improvements in both the web interface (Purview Compliance portal) and the Security and Compliance Center PowerShell module. PowerShell provides a unique and powerful interface with which to manage Labels programmatically either for creation, management or reporting purposes. Therefore, learning to use PowerShell with Labels can make for a better experience depending on how complicated an environment is.
Planning
As this is a PowerShell article, I do not want to spend too much time on this aspect. So, I will keep it short and sweet. If you are thinking about applying Labels to documents in your tenant or organization, remember to plan. Know what your goals are, who will be affected, what communications you may need to put out there as well as being able to manage this change. So do your homework before creating Labels! Decide on color schemes if using that feature as well as naming, as end users will need names that make sense. Create an FAQ and publish it so that users will be able to use the Labels created properly.
Create New Labels
Creating a Label with PowerShell can be done in a simple to a complex manner depending on what the Label needs in terms of settings. The easiest way to break this down is to decide the workload, the users who will use the respective label, what (if any) visual cues will be provided. Basic Labels are created with very little PowerShell code:
With this one-liner, we now have a simple Label, called Confidential whose name is exposed to both administrator and end user. However, that is all this Label has to it, no settings like encryption, colors, or other settings are configured. This new Confidential Label can be applied to documents but would be more ornamental than anything else. As alluded to earlier, there are a lot of additional options and settings that can be used with Labels to make them more functional.
Encryption
Encrypting documents and emails is a popular option with Labels within Microsoft 365, and with PowerShell, we have a number of parameters that we can set to extend a Label's usefulness.
EncryptionDoNotForward: Enables Do Not Forward protection for the object the Label is applied to. Requires EncryptionEnabled set to $True.
EncryptionDoubleKeyEncryptionUrl: In Public Preview. Used to point the Label to the Double Key Encryption endpoint URL for this encryption type.
EncryptionEnabled: Default value is $False, must be set to $True in order for Encryption to be utilized in a Label.
EncryptionOfflineAccessDays: Specifies the number of days a user can be offline and not check-in for the encryption to be allowed. Requires EncryptionEnabled set to $True.
EncryptionPromptUser: $False by default, if set to $True, users can define permissions for Word, Excel and PowerPoint documents. Requires EncryptionEnabled set to $True.
EncryptionProtectionType: Allowed values are Template, RemoveProtection and UserDefined. Use this to assign an AIP template remove protection on a document or assign User Defined protection. Requires EncryptionEnabled set to $True.
EncryptionRightsDefinitions: Use this parameter to assign granular rights for this Label. Requires EncryptionEnabled set to $True.
EncryptionContentExpiredOnDateInDaysOrNever: Set an expiration of 'never' or a certain limit of days. Requires EncryptionEnabled set to $True.
Now, a couple of available parameters are reserved for Microsoft use only, so do not use these on your own Labels: EncryptionEncryptOnly and EncryptionLinkedTemplateId. Additionally, one parameter 'EncryptionAipTemplateScopes' is only to be used with AIP Classic, which should be avoided as this feature is deprecated within Microsoft 365.
Examples
New Label with Do Not Forward
Allow 35 days of Offline Access and Configure User Permissions
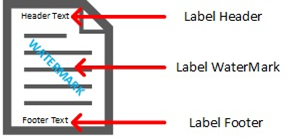
Visual Settings for Labels
In addition to the encryption side of Labels which users may or may not see, we also have options for adding visual cues on Labels. And they can be divided into three categories:
- Header
- Footer
- Water Markings
Header Options
ApplyContentMarkingHeaderText,
ApplyContentMarkingHeaderAlignment,
ApplyContentMarkingHeaderEnabled,
ApplyContentMarkingHeaderFontColor,
ApplyContentMarkingHeaderFontSize,
ApplyContentMarkingHeaderMargin,
ApplyContentMarkingHeaderFontName
Footer Options
ApplyContentMarkingFooterFontSize,
ApplyContentMarkingFooterMargin,
ApplyContentMarkingFooterAlignment,
ApplyContentMarkingFooterText,
ApplyContentMarkingFooterFontColor,
ApplyContentMarkingFooterEnabled,
ApplyContentMarkingFooterFontName
Water Marking
ApplyWaterMarkingFontSize,
ApplyWaterMarkingFontName,
ApplyWaterMarkingFontColor,
ApplyWaterMarkingText,
ApplyWaterMarkingLayout,
ApplyWaterMarkingEnabled
These three visual marker types have similarities which will enable a consistency of appearance depending on which ones are used in a newly created Label. These commonalities are the font color, size, and name as well as alignment and margins. Below are some example Labels with headers, footers, and watermarks:
Watermark

Header and Footer

Local Settings
Microsoft 365 is obviously a multinational service that has users around the world and speak languages other than English. In order to accommodate these users and make Labels useful in a particular locality, Microsoft provides a parameter called 'LocalSettings' which allows for this customization. Supported languages can be found in Microsoft's documentation Language identifiers and OptionState Id values in Office 2016. With this setting, we can change the Display Name and Tooltip the user sees to their local language. Note that this will work with supported Office Languages if the user has made the change in their app.
How does this work within PowerShell? First, review the example provided in the Get-Help for the New-Label cmdlet:

Then craft your own, based on the language that is needed, which in our below examples are English and French for an organization that operates in Quebec, Canada and Miami, Florida, USA:
Label Name and Tooltip
When crafting the above text, mind your command, brackets, and naming, as these are all important to this one-liner.
Advanced Settings
Beyond what we have listed in Get-Help for the Label cmdlets, there are advanced settings that are not available in the GUI, but only available through PowerShell. At this time, there are way too many available settings that can be configured, but we can cover a couple here and leave a link to the rest afterwards:
Set a Label Color
Report an Issue
Advanced Settings Documentation
Read more here (Link to Microsoft Documentation)
Modify Existing Labels
PowerShell also allows for modification of Labels if a change is needed, or a mistake has been made when a Label was created. Available parameters for the New-Label cmdlet are similarly offered in the Set-Label cmdlet, which allows for a wide range of changes to the Label. We can adjust ToolTips to be more user friendly, adjust colors and more with the Set-Label cmdlet. Below are some examples of this:
ChangeColor to a Yellow from the pre-existing color used
Change ToolTip text
Obviously, there are more options, but these two are practical changes that could occur post Label creation.
Applying Labels
Now that we have a few Labels to work with we can start applying these Labels with Label policies. Depending on the complexity of the Label, scenario, etc, a Label Policy can be simple to complete. The New-LabelPolicy and Set-LabelPolicy allow for setting data locations, exempting locations as well as just combining multiple Labels into a simple bundle for users to access. The simplest approach is to publish two previously created Labels globally like so:
We can also tailor the Labels to certain Exchange locations, like so:
Either way, we chose to publish Labels that can now be used in emails, documents and more. One thing to keep in mind is the following:I If a Label has been used by the user population, it would be better to remove the Policy and leave the Label behind, because removing an applied Label causes errors visible to users, that may cause issues/help desk calls.
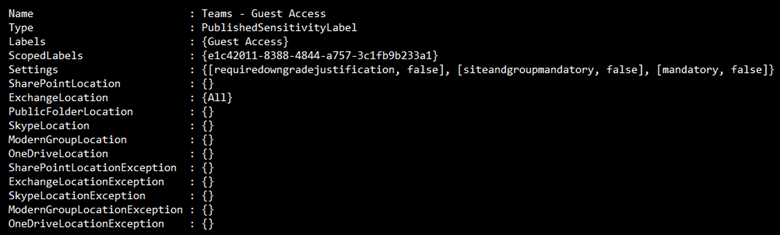
Label Reporting
Just as important as it is to create and publish Labels, it is also important to verify Labels and document them for IT processes and possibly compliance reasons. The Get-Label and Get-LabelPolicy cmdlets are useful for pulling lists of these objects from a tenant and can be used for documentation, verification and or auditing of the current configuration. Some key properties of a Label are Settings, LabelActions, Conditions, LocalSettings, ToolTip and ContentType.
Examples
Filter: Labels with Label Actions
Filter: Non Email/File Labels
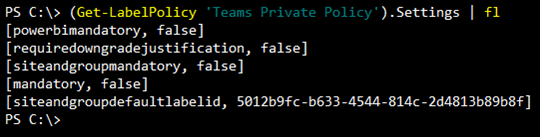
Label Policy Reporting
Using the Get-LabelPolicyRule, like we did with the Get-Label cmdlet, we can export settings used in Label Policies for validation and/or documentation purposes:
Examples
Note that some of these fields may get long and may need to be expanded to see all settings properly:

Removing Labels
Removing Labels, while possible, should always be treated with caution. If Labels have been applied and the applied Label is removed, an orphaned Label scenario will occur which means the Label information will be retained by the document but not viewable by the client. If the Label has not been applied, then removing the Label is OK. Examples of Label and Label Policy Removal. In order to remove a Label, we need to make sure it is not part of Label Policy:
Example
From the above output, the bottom line shows a policy called 'Test44 Label Policy' that contains a Label called 'test44' and both were used in a test of features in Labels. Now the Label and its connected Label policy are no longer needed. How do we remove both? First, we need to remove the policy:
Then, once the policy is removed, we can remove the Label:
Both will ask to confirm removal. Remember that removing a Label should be done as a last resort as it could have negative effects on a user's experience.
Conclusion
As we can see, PowerShell provides us with useable cmdlets and syntax to create a set of Labels to be used by an organization. Another advantage of PowerShell is creating proper documentation of Labels and Policies that are used in an environment and can assist in determining which Labels are active or inactive for possible cleanup or utilization. Additionally, advanced settings, not available in the GUI, can be configured with PowerShell which are well documented by Microsoft. Keep in mind that any Label / Label Policy should be fully vetted prior to going to production. It is much easier to fix an issue with a small test group rather than a much larger population.
Running PowerShell scripts securely is essential when it comes to administration of complex IT infrastructures. Amongst others, the necessary credentials have to be kept safe. PowerShell itself already comes with a lot of security features, and ScriptRunner extends these for secure delegation and central management of scripts and credentials. Our PowerShell Security Best Practices webinar is aimed at administrators, IT and DevOps professionals, PowerShell developers and IT managers.
In this webinar, we covered:
- How to use the PowerShell SecretManagement module
- Working with execution policies
- Secure credential management
- Password server integration
- Delegation of single, parameterizable PowerShell scripts without administrative rights of the user
- Secure browser-based execution of PowerShell scripts
Click here for the Webinar Recording!
Related links
- ScriptRunner ActionPacks will help you automate tasks
- Try out ScriptRunner here
- ScriptRunner: Book a demo with our product experts