
14 min read
Privacy Management with PowerShell – Let's look at the core features of Priva!
All you need to know about Privacy Management, privacy management policies, rules, and subject rights requests.
Hackers. Spammers. Phishing. Oh my! (Okay that was cliché.)
But seriously, Exchange Online faces a lot of attacks, attack vectors and malicious actors. The job of an admin has gotten tougher with the move to cloud services in terms of security. However, companies like Microsoft are making an effort to allay these fears and provide the Exchange Online Admin with Tools to handle these threats. In this article we will look at how you can use PowerShell to provide security for Exchange Online.
First, we have the concept of Authentication:
Basic Authentication uses a password request/response for each interaction with a resource in Exchange Online. No other access requirements are implemented. If a connection is not secure when connecting to Exchange Online, then the password could be intercepted.
Modern Authentication is based on using the OAUTH 2.0 and ADAL (active Directory Authentication Library) using Token based authentication, which offers much greater security.
Older tenants may have Modern Auth turned off, while newer tenants have this turned on by default. We can check our tenant by running this one-liner in Exchange Online PowerShell:
Get-OrganizationConfig | Ft OAuth2ClientProfileEnabledThe output shown in Figure 1, indicates that Modern Authentication is turned on:

he output shown in Figure 1, indicates that Modern Authentication is turned on:
If this were False, Modern Auth would be turned off, which is against best practices for Office 365 and not a very secure posture either. Make sure this is on. Keep in mind that this does not block Basic Auth clients from connecting to Exchange Online. We have other ways to do this. Next up, blocking Basic Auth!
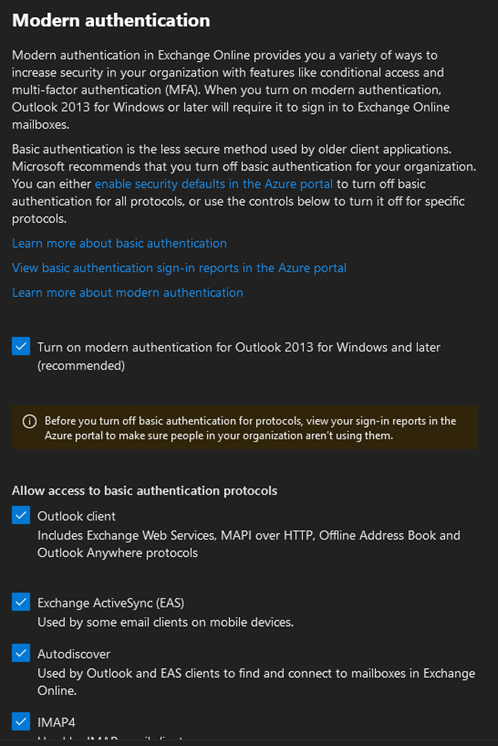
Blocking Basic Auth for Exchange Online can be done via at least two different methods. One of these is Conditional Access, which we will not explore (but it can be done with PowerShell!) and the other method is what is known as an Authentication Policy. An Authentication Policy allows us to control which aspects of Exchange Online use Basic Auth or cannot use Basic Auth. First, what is the default configuration for an Authentication Policy? Well, actually, none!
Get-AuthenticationPolicy | fl
Okay. Well, if there is no policy, then what can we do? We create one. With PowerShell OR by making a change in the M365 Admin Center. How would we do that? First, we need to find the default Authentication Policy. The Authentication Policy is actually in the M365 Admin Center under Settings → Org Settings → Modern Authentication which reveals this:
To get the policy to appear in PowerShell, we simply uncheck one item, say IMAP, save the settings and wait 15–30 seconds. After waiting, we can run:
Get-AuthenticationPolicy | fl
to see the change made:
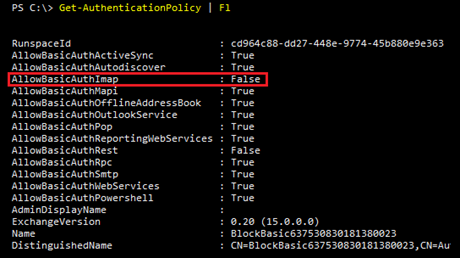
Notice that AllowBasicAuthIMAP is disabled. To block Basic Auth for all these protocols, we can run this one-liner:
Set-AuthenticationPolicy -Identity 'BlockBasic637530830181380023' -AllowBasicAuthActiveSync:$False -AllowBasicAuthAutodiscover:$False -AllowBasicAuthImap:$False -AllowBasicAuthMapi:$False -AllowBasicAuthOfflineAddressBook:$False -AllowBasicAuthOutlookService:$False -AllowBasicAuthPop:$False -AllowBasicAuthReportingWebServices:$False -AllowBasicAuthRest:$False -AllowBasicAuthRpc:$False -AllowBasicAuthSmtp:$False -AllowBasicAuthWebServices:$False -AllowBasicAuthPowershell:$FalsengWebServices $False -AllowBasicAuthRpc $False -AllowBasicAuthSmtp $False -AllowBasicAuthWebServices $False -AllowBasicAuthPowershell $FalseGet-AuthenticationPolicy | fl
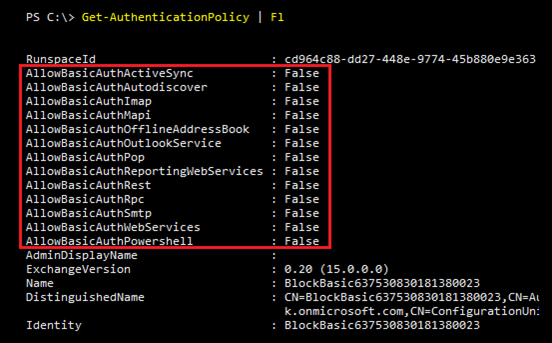
We now have basic disabled for the entire list of connection types available to connect to Exchange Online.
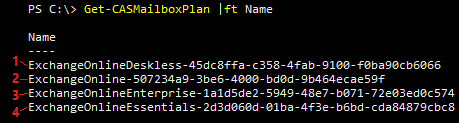
For Exchange Online, Microsoft provides many protocols for end users to connect to their mailbox. We have IMAP, POP, ActiveSync, ECP, MAPI, OWA and more. Typically, we want to block less secure protocols like IMAP4 and POP3 so that users will not use these to connect a mailbox to. We can control these connections with the CasMailboxPlan cmdlets. Generally, there are four main CAS Mailbox Plans available in Exchange Online, but this number could vary depending on your licensing model.
For our example, we have an Exchange Online tenant with either E3 or E5 licensing. If we run Get-CasMailboxPlan | Ft Name, we see these plans:
We can view what one of these plans has available by running this cmdlet:
Get-CASMailboxPlan ExchangeOnlineEnterprise-a198b3f1-d047-49ed-b00d-b9ae84d0390a | Fl *Enabled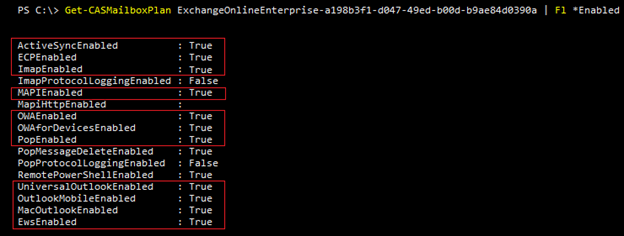
Now, if we need to turn off protocols, IMAP and POP are prime candidates, we can do so like this:
Set-CASMailboxPlan -Identity ExchangeOnlineEnterprise-a198b3f1-d047-49ed-b00d-b9ae84d0390a -IMAPEnabled $False -POPEnabled $FalseWe can make this change to all plans at one using this one-liner:
Get-CASMailboxPlan | Set-CASMailboxPlan -IMAPEnabled $False -POPEnabled $FalseBy doing this we have now reduced attack angles for Exchange Online mailboxes access.
One of the oft-overlooked features of web mail, known as OWA, is the offline mode feature. This feature leaves an unencrypted copy of the last 500 emails on your device for easy access while you are not connected. The theory is that a frequent traveler will be able to work with their most recent emails, creating responses and working with the information contained in their most recent emails. However, the lack of encryption is the Achilles heel for the set-up.
We can view this with PowerShell for the OWA Mailbox Policies like so:
Get-OwaMailboxPolicy | Ft AllowOfflineOn
We see that it is indeed on. Now how do we turn this off? Well, we have three options for AllowOfflineOn – PrivateComputersOnly, NoComputers or AllComputers. The value we need is ‘NoComputers’, thus turning this off requires the name of the policy and the parameters for AllowOfflineOn:
Set-OwaMailboxPolicy -Identity OwaMailboxPolicy-Default -AllowOfflineOn NoComputersIf we have more than one OWA Mailbox Policy, we can turn it off for all of these at once:
Get-OwaMailboxPolicy | Set-OwaMailboxPolicy -AllowOfflineOn NoComputersUsers cannot use Offline Mode now for OWA and their email is more secure.
Depending on licensing and features enabled in Exchange Online, EOP and Defender for Office 365 can provide quite the layered defense against malicious emails. These layers include Anti-Spam, Anti-Phishing, and more.
In order to first assess where we are, we can use a PowerShell module called ORCA to look for gaps. ORCA is an abbreviation for “Office 365 ATP Recommended Configuration Analyzer Report” which was named prior to Microsoft changing the entire naming scheme for their products.
More accurately, this script will check your Defender for Office 365 Configuration now. We can install this module by opening a Windows PowerShell window and entering this code:
Install-Module ORCAGet-ORCAReport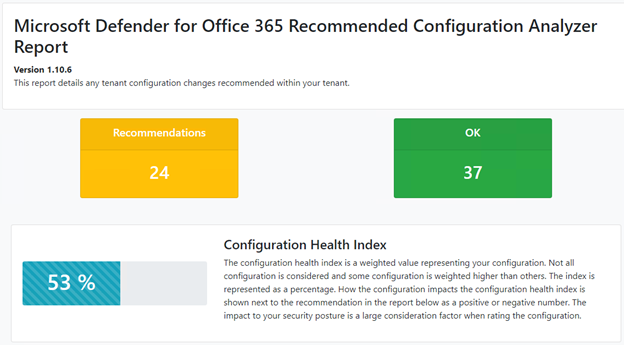
We can also see a similar feature in the Security and Compliance Center called “Configuration Analyzer”. Of note is that to fix any issues here are entirely located in the GUI. With the large number of validation checks made (over 60) a script solution to resolve these issues would be out of reach of most admins. This PowerShell module should be used for singular or automated reporting on the current state of protection. Remediation via PowerShell is outside the scope of this article due to the complexity of configuration and range of features / PowerShell cmdlets needed to accomplish this task.
If, for some reason, a tenant does not have Defender for Office 365 licensing, an evaluation of the features should be put in place to judge the value of the product. We can turn on the evaluation mode in the Security and Compliance Center → Threat Management → Policy → Evaluate Defender for Office 365
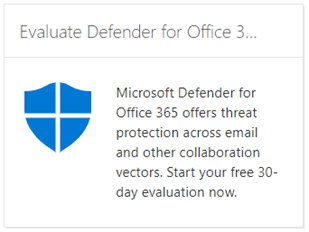
The demo stays active for up to 90 days and reporting is included in the evaluation, which should be reviewed for effectiveness.
Exchange was one of the first products to get the concept of Role Based Access Control where operations and functions in Exchange we granted via Role Groups and Management Roles.
Management Roles are the more granular permissions involved in access Exchange functions like Journaling, Legal Hold and more. Whereas Role Groups are groupings of these Management Roles to logically create a job function or a role that someone could fulfill to complete legitimate tasks in Exchange. Now these same concepts have moved from Exchange to Exchange Online.
Write-Host " Role Group Members "

Write-Host "----------------------"

$RoleGroup = Get-RoleGroup

Foreach ($Group in $RoleGroup) {

    $Name = $Group.Name

    $Members = Get-RoleGroupMember -Identity $Name

    If ($Null -ne $Members) {

        Write-Host "$Name"+": "

        Foreach ($Member in $Members) {

                $MemberName = $Member.Name

                write-Host " - $MemberName"

        }

        Write-Host ''

    } Else {

        Write-Host "** $Name has no members."

        Write-Host ''
    }
}
When run, this set of code will help us analyze if there are too many users assigned to high privileged roles:
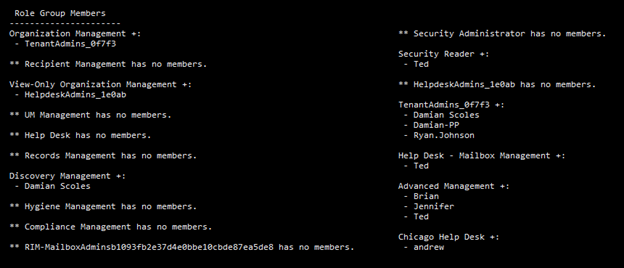
For this tenant, no group has more than three users in a Role Group and for most scenarios this is a good number to work with.
After running the report, each group should be assessed for valid accounts and if the user still needs to be in that Role Group. If not, accounts should be removed. Additionally, a review of these assignments should take place periodically in conjunction with other security reviews.
Do you have frequently recurring tasks in the daily operation of Exchange / Exchange Online? Learn now how to:
In Office 365, there are also a few ways that we can enable MFA for users in a tenant. We can use Conditional Access, Security Defaults or assign them individually. For this article we will walk through how to do this via individual assignment as an example of how we can secure users in a tenant. First, before we dig in, let’s review why Multi-Factor Authentication should be used:
Microsoft has plenty of resources on this and a good place to start is the Microsoft Security page about Multi-Factor Authentication (MFA).
In order to enable MFA at a user level, we first need to connect to the MSOL Service via a PowerShell module. If you do not have this installed, rectify this by running:
Install-Module MSOnlineConnect-MsolService$st = New-Object -TypeName Microsoft.Online.Administration.StrongAuthenticationRequirement
$st.RelyingParty = "*"
$st.State = "Enabled"
$sta = @($st)Set-MsolUser -UserPrincipalName damian@practicalpowershell.com -StrongAuthenticationRequirements $sta
(Get-MsolUser -UserPrincipalName Damian@practicalpowershell.com).StrongAuthenticationRequirements | FlNow we just need to rinse and repeat for all users that need MFA. Once completed, we can verify which users have this set with this code:
Get-MsolUser -All | Where {$_.StrongAuthenticationRequirements -ne $Null} |ft DisplayName, UserPrincipalName,StrongAuthenticationRequirementsAnd we see our enabled users:

With that we can validate our users have MFA enabled on a per-user basis.
Looking back at the configuration settings that were performed above we can come to some conclusions about Security, PowerShell and Exchange Online:
In order to get a fuller understanding of the PowerShell above and the security posturing that was performed, make sure to read Microsoft’s Docs pages on each topic. Using this article, along with the Docs pages, you will be able to handle the tasks above and have confidence in configuring them for your tenant. Security is key in Exchange Online, so make sure to apply the features above to your tenant.
Jul 16, 2024 by Damian Scoles
All you need to know about Privacy Management, privacy management policies, rules, and subject rights requests.
Jul 3, 2024 by Matthias Jütte
Every last Friday of July, we get to celebrate System Administrator Appreciation Day, a special day dedicated to...
Jul 2, 2024 by Philip Lorenz
Windows PowerShell 5.1 is usually preinstalled and the default – is it worth switching to PowerShell 7, or will it lead...
Damian Scoles is a ten-time Microsoft MVP specializing in Exchange, Office 365 and PowerShell who has 25 years of IT industry experience. He is based in the Chicago area and started out managing Exchange 5.5 and Windows NT. Over the years he has worked with Office 365 since BPOS and his experience has grown to include Azure AD, Security and Compliance Admin Centers, and Exchange Online. His community outreach includes contributing to TechNet forums, creating PowerShell scripts that can be found on his blogs, writing in-depth PowerShell / Office365 / Exchange blog articles, tweeting, and creating PowerShell videos on YouTube. He has written five PowerShell books and is also actively working on the book "Microsoft 365 Security for IT Pros".
