.svg)
.svg)

In another post I covered how to create new Citrix MCS (Machine Creation Services) machines which only requires the use of the Citrix Studio cmdlets. For PVS on the other hand, we have to use PowerShell cmdlets for the hypervisor in use, which in this post will be VMware vSphere, Citrix PVS cmdlets to add the device to PVS and then Studio cmdlets to add the new machines to a machine catalogue and thence to a delivery group.
To this end we need a machine, ideally not a PVS server or Delivery Controller, which has VMware PowerCLI, Citrix Studio and the PVS console installed as that will give us all the cmdlets we require.
However, with PowerShell 3.0 and above you can use implicit remoting to import modules from a remote machine, assuming remote management is set up, so that they do not need to be installed locally. Note that we cannot do this for the Studio cmdlets for our use case here because we require access to the PowerShell (PS) drive XDHyp: created by the Citrix. Host snapin/module and unfortunately PS drives do not work with implicit remoting.
Creating Virtual Machines
Unlike with MCS where the Studio cmdlets create the new VMs, for PVS we have to create the new VMs ourselves using the hypervisor cmdlets. This article doesnt go into mechanisms for finding unused machine names, where their existence, or rather lack of it, needs to be checked in the hypervisor, PVS, Studio and Active Directory. However, it is possible and comes into its own when adding, and removing, machines automatically.
In vSphere, I have previously created a template for my PVS machines (Server 2019) which has the required CPU, memory and NICs allocated and a 40GB hard drive configured for the event logs, so they are persistent, and for the RAM cache overflow and pagefile. The New-VM cmdlet requires a handle to this template, so we fetch it first thus:
Import-Module -Name VMware.VimAutomation.Core -Verbose:$falseConnect-VIServer -Server yourvcenter$template = Get-Template -Name $templateName
Where $templateName is the name, or pattern, for a unique vSphere template. In a script we would check that $template is not null and is also not an array since the latter means we dont have a single, unique template so the New-VM call will fail.
For New-VM to succeed, we need to at least specify a resource pool (retrieved via Get-ResourcePool) and a location (retrieved via Get-Folder). In the complete script Ive written to create new PVS devices, an existing PVS device can be specified where its resource pool and location are used for these parameters in New-VM.
$newVM = New-VM -Template $template -Name $newMachine-Description $descripticon -ResourcePool $resourcePool-Location $folder
This runs synchronously, as in does not return until the VM creation has finished although because the template uses a mostly empty thin provisioned disk, the creation should not take long.
It could be run asynchronously via the -RunAsync parameter but the use of that is beyond the scope of this article since we need to ensure that it has finished before we continue with the next steps. Make sure to check the $newVM is not null, which would mean that the creation has failed, before continuing.
Adding Machines to PVS
In order to add the newly created VM to PVS, we need to have the MAC address for the NIC which will boot from a PVS server. We do this thus:
$NICs = Get-NetworkAdapter -VM $newVMNote that we must check that there is only one NIC returned my full script has an optional parameter of a network name where we can filter the NICs on that if necessary. Also be aware that VMware returns MAC addresses with a : delimiter but PVS requires them with a delimiter which is easy to fix using -replace.
The MAC address is just one piece of information we need to pass as a parameter I often use a technique called splatting to pass arguments to cmdlets/functions as it allows you to build parameters in a hashtable (dictionary) and then pass the hashtable instead of, or as well as, regular arguments. A sample hashtable passed to New-PVSDevice might be:
Tab. 1: Sample hashtableNameValueSiteNameWakefieldDeviceMac00-50-56-bd-57-4eDescriptionCitrix PVS machineCollectionNameXenAppsDeviceNameGLXA19PVS021
Which is then passed like this:
Set-PvsConnection -Server yourpvsserver$newPVSDevice = New-PvsDevice @pvs$newPVSDevice = New-PvsDevice @pvsdeviceParameters
Where the hashtable is called $pvsdeviceParameters and noting that username, domain name and password can be passed to Set-PVSConnection if required (e.g. the user running the script does not have sufficient PVS privileges but beware of storing/passing clear text passwords).
Assuming the call has succeeded, we now have a new PVS device, although it does not have a PVS boot disk assigned to it. This we do with Add-PvsDiskLocatorToDevice, and then we add it to Active Directory by calling Add-PvsDeviceToDomain which takes DeviceName and OrganizationUnit arguments. The latter requires the OU in a slash delimited form, e.g. Sites/Wakefield/Computers/RDS/PVS.
Following successful completion of these steps, the device should appear in the PVS console in the selected site and collection (which could have been pre-existing or newly created via New-PvsSite and New-PvsCollection respectively).
Adding Machines to a Catalogue
This is the most cumbersome step in the process because to add the machine to Studio, we need to know the hosted machine id for the newly added VM. We can get it via the hypervisor connection through the XDHyp: PS drive. This is achieved using the cmdlet Get-Childltem which you have probably used previously via one of its aliases dir or Is (see figure 1).
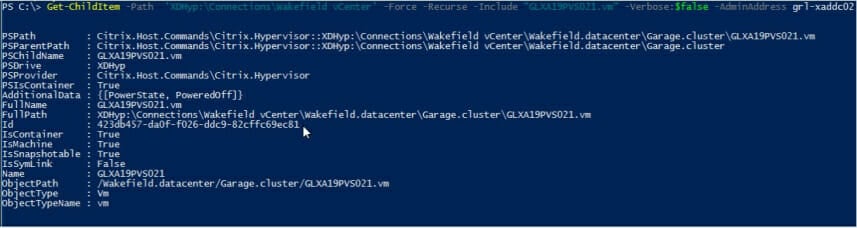
Fig. 1: Output of Get-ChildItem
Note that we are passing -AdminAddress to direct the cmdlet to run on a specific delivery controller, as we do for all Studio cmdlets, ideally via splatting. -Verbose:$false is passed so that the cmdlet does not produce verbose output even if the containing script has been invoked with -verbose or the $verbosePreference built-in variable set to Continue.
We can now call New-BrokerMachine with the Uid of the machine catalogue we want the machine to go into (via Get-BrokerCatalog -Name) as well as the name of the new machine itself, the hosted machine id, from Get-ChildItem above, and the hypervisor connection uid which we also get from Get-ChildItem thus:
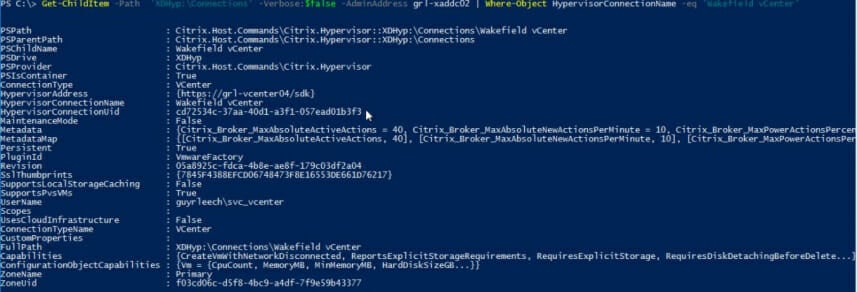
Fig. 2: Output of Get-ChildItem with the before mentioned parameters
Assuming this is successful, the machine will be visible in Studio in the chosen machine catalogue although it has yet to be added to a delivery group which is the final step.
Adding Machines to a Delivery Group
The cmdlet used to add machines from a catalogue to a delivery group is Add-BrokerMachinesToDesktopGroup, but its parameters do not include the name(s) of the machines to add instead we tell it the source machine catalogue, the destination delivery group and the number of machines from the catalogue that we wish to add which is actually how you would do it manually via the user interface in Studio.
Add-BrokerMachinesToDesktopGroup returns the number of machines added to the delivery group so we check that is the same as the number we requested it to add via the -Count argument.The delivery group in Studio should now show these newly added machines, or you can retrieve them with Get-BrokerMachine -DesktopGroupName:
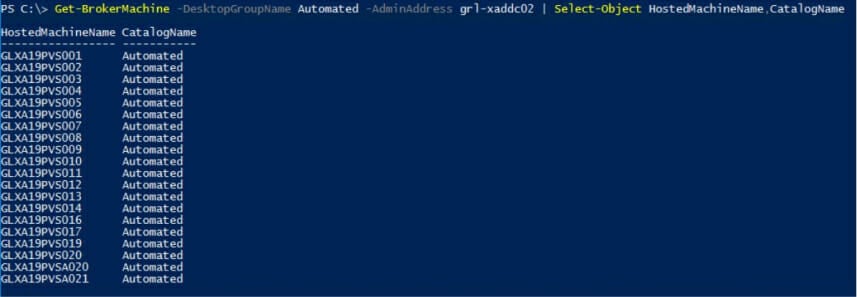
Fig. 3: Output from running Get-BrokerMachine -DesktopGroupName
Example Script: Create New PVS Devices
To help you put your newfound knowledge directly into action, Ive created a sample script that you can download from ScriptRunners GitHub.
It allows you to create new Citrix PVS devices from a VMware vSphere template and optionally add them to a Citrix machine catalog and deployment group, and optionally to a published desktop.
By the way, the script is PowerShell Get-Help compatible. If you have any further questions or feedback about the script, please feel free to get in touch with us!
ActionPack for Citrix

Getting started with PowerShell task automation is now even faster and easier with our new ScriptRunner ActionPack for Citrix!
200 ready-to-use PowerShell scripts are now freely available on the ScriptRunner GitHub repository.
Download for free from GitHub >
Related links
- ScriptRunner ActionPacks will help you automate tasks
- Try out ScriptRunner here
- ScriptRunner: Book a demo with our product experts