Skip to the main content.

ScriptRunner Blog

Getting Devices Started in Windows Autopilot

Table of Contents

Post Featured Image

The following article provides you with an easier and faster way to register devices in Windows Autopilot. It saves you the manual process of creating and uploading a CSV file and automates the process for future use.


No time and mood for a time-consuming registration of devices in Windows Autopilot?

I have been looking for a way to register devices or virtual machines in Autopilot without installing or resetting. There are several ways to do this. The device can be registered manually on the website. A more elegant way is to use the Microsoft Graph API. But there is also a third possibility.

Windows Autopilot is a Microsoft Azure service with which you can register devices with identifiers. This works similar to the Apple Device Enrollment program. With the registration, Microsoft Azure gets the necessary information to use the devices and assign profiles. To do this, you run a script that generates a CSV file for the enrollment and then upload it to Windows Autopilot.

To solve the registration with a CSV file unfortunately brings a certain effort with it. The CSV must be created, evaluated and imported. However, I would like to solve the whole thing offline without Azure Automation, since using the Microsoft Azure Automation account costs money. So how can I put a USB stick in someone’s hand, which can then be used to do the automated registration offline on autopilot without logging into my portal?
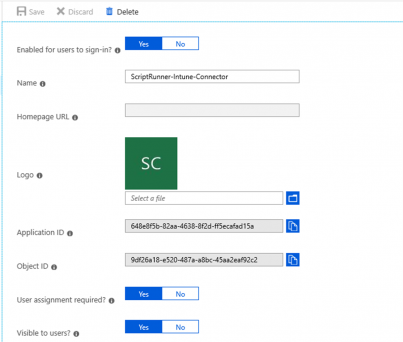
 

Alternative registration with ScriptRunner in three steps


1. Prerequisites

  • First, I created a Microsoft Azure Enterprise Application called “ScriptRunner-Intune-Connector”.
  • Then I gave a service account from my domain access to Application.

Set up application

  • Then I gave a service account from my domain access to Application. Now access to Windows Autopilot is possible.
  • To allow Application to read & write to the list, I still maintained the necessary permissions.

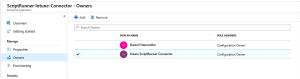
Grant access and permissions


2. Scripts for ScriptRunner

  • As ScriptRunner Action I wrote a script, which addresses the “ScriptRunner-Intune-Connector” and so registers the devices in Windows Autopilot.
  • So that the MicrosoftGraphAPI gets the necessary information to address the application, the ApplicationID is used.

The script is structured to extract a username and password from the PSCredential object to generate a token for the application. Then the module “WindowsIntuneAutopilot” is loaded and thus the information is added to Windows Autopilot.

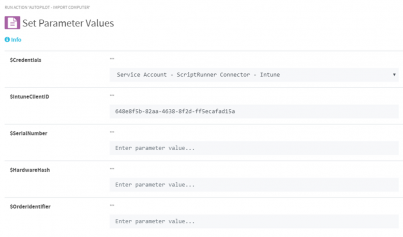
Address Application with ScriptRunner

The action now waits until the device appears in the list and has been synchronized. This ensures that the device has been correctly imported into Windows Autopilot by ScriptRunner.


Sync device list


ScriptRunner installed yet?

  • Download the free trial version and get to know ScriptRunner without any strings attached.
  • We’re happy to support you in setting up your test environment and answer any questions you may have about the product.
    Get your free trial

3. PowerShell functions for automation

With the first two sections done, we now have a ScriptRunner action that can register devices on autopilot. Since I can’t assume that HardwareHash and SerialNumber can be entered there, manual rework is still necessary. How can this be solved better?
  • I wrote a Powershell function that addresses the ScriptRunner directly via port 8091 and mimics the Delegate App / Admin App.
  • I put this function into a script so that it can be executed from the client.
  • The script can now be copied to a USB stick with the Windows installation CD and called directly after installation. Alternatively, the script can also be executed directly at the language selection when the client is booted.

ProTip: In the language selection you can start a command prompt with “Shift+F10”.

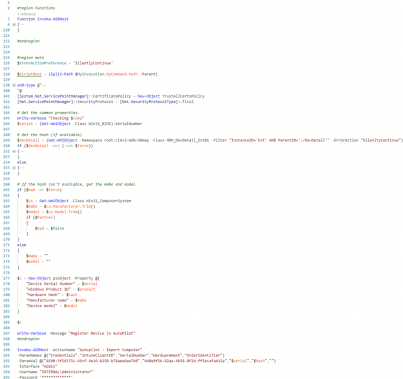
Script with PowerShell function for client execution


This is how the process looks


ScriptRunner method summary

  1. Create a Microsoft Azure Enterprise Application
  2. Grant access to the Application
  3. Set permissions to read & write
  4. Creata a ScriptRunner Action for registration
  5. Use ApplicationID for addressing the application via the Microsoft Graph API
  6. Write a PowerShell function for delegation/admin execution via port 8091 and put it in a script
  7. Copy script to a USB drive and run


Conclusion

ScriptRunner allows users to register devices in Windows Autopilot in three steps. There is no need to create and upload a CSV file. With no manual rework, the process is now quite simple:
  • a device is installed/booted with Windows 10
  • At the language selection just call the command prompt with “Shift+F10”.
  • Now run the script and the desired device will be automatically registered in Windows Autopilot

For me, ScriptRunner helped me with the implementation because I could register my devices in Windows Autopilot without much hassle and I didn’t have to spend a lot of time registering devices.


Related posts

3 min read

ScriptRunner now available in the Microsoft Azure Marketplace

6 min read

Managing Microsoft Exchange with PowerShell

2 min read

VMUG Webcast: Mastering VMware Management with PowerCLI