.svg)
.svg)

Are you migrating your organization to Exchange Online? Will you use Exchange Online Protection (EOP) alone, or combine it with third-party products? We'll look at different solutions how to stay safe.
When migrating an organization from an on-premises mail solution to Exchange Online, a typical scenario is how to handle mail flow at the end of the project when the on-premises email solution is no longer present. Some organizations have never used Exchange Online Protection (EOP) and are using a third-party solution like ProofPoint, MessageLabs or Barracuda for example. At this phase of the project, a decision needs to be made switch to just EOP or maintain the current third-party email hygiene product and incorporate EOP into that mix.
While switching to EOP may seem simple, it may not necessarily be due to existing rules and configuration settings that are in place. Also, comfort level with this product may not lend itself to switching to EOP for the single approach. Luckily, there are some settings we can put in place for EOP (and Defender) to handle this scenario.
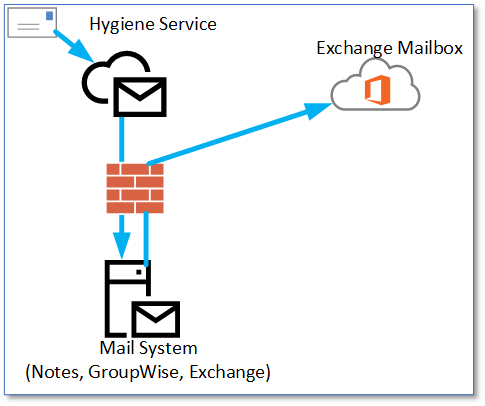
Before
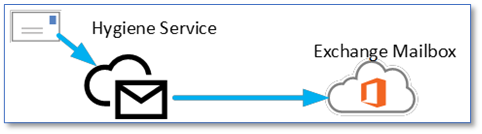
After
The Solution
To make this work properly, we need to make some changes so that EOP can treat the traffic as trusted SMTP communications. We can accomplish this task with three different methods or solutions which we will go through next:
Solution 1
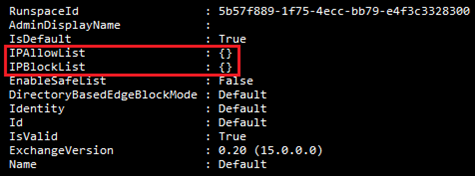
Prior to some changes that Microsoft made in their Exchange Online Protection (EOP) configuration, the typical configuration for processing email from an external hygiene vendor was to create connection filter entries for server Ips. That explains how to do this in a tenant. The same actions can also be performed in PowerShell. First, we will check what Connection Filters are in place now:
Get-HostedConnectionFilterPolicy
In a greenfield environment, we should see this:
In the case of Mimecast inbound messages, we need to add IPs to the 'IPAllowList' to make this work. If we had (for example) IP addresses of 207.12.34.4 and 5, we could add them with this one-liner:
Set-HostedConnectionFilterPolicy Default -IPAllowList 207.12.34.4,207.12.34.5
Solution 2
Another method used is to create a Transport Rule which will accept connections from the third-party provider and skip EOPs spam filtering engine. We simply need the IP addresses of the provider and a parameter called ExceptIfSCLOver, which is set to -1 per Microsofts documentation for Transport Rules and we have this one-liner:
New-TransportRule 'Inbound from Mimecast' -SenderIpRanges 207.12.34.4,207.12.34.5 -ExceptIfSCLOver -1
With this, any email from those IP addresses will bypass spam filtering.
Solution 3
In this solution, we will use something to which Microsoft added a new capability called Enhanced Filtering (Skip Listing). Skip listing allows for EOP to better analyze an email as it comes in from a third-party hygiene service that is in front of EOP. There are two parts to this configuration to make it work - Inbound Connector and Enhanced Filtering.
New Inbound Connector
New-InboundConnector -Name 'Mimecast Inbound' -ConnectorType Partner -SenderDomains '*' -SenderIPAddresses 207.12.34.4,207.12.34.5
Adding Skip Listing Settings
Once we have a connector, we can also add Skip Listing settings to the connector. There are two possible parameters for configuring this on the Inbound connector and they are EFSkipLastIP and EFSkipIPs. Using the EFSkipLastIP value will tell EOP when a header review is performed to skip the last IP prior to being received by EOP, assuming this is the service provider's IP. The other property EFSkipIPs allows for the manual configuration of specific IP addresses. Below is an example of both parameters used:
Set-InboundConnector -Identity 'Mimecast Inbound' -EFSkipLastIP $TrueSet-InboundConnector -Identity 'Mimecast Inbound' -EFSkipIPs 207.12.34.4,207.12.34.5
Skip listing could also be filtered to single or multiple users if so desired, perhaps for testing:
Single User
Set-InboundConnector -Identity 'Mimecast Inbound' -EFUsers damian@practicalpowershell.com
Multiple Users (Group)
Set-InboundConnector -Identity 'Mimecast Inbound' -EFUsers it@practicalpowershell.com
CAUTION! A word of caution is warranted because the IP addresses specified will be allowed more leniency than other IP addresses. It may be worthwhile to verify these IP addresses on a quarter or six-month period in case this changes/these change.
Phish Simulations
One of the more common attack vectors for email is Phishing and many vendors have created solutions to remove as much of this attack from a user's view as possible. However, there remain emails that are not blocked by these solutions and end up in a user's mailbox. To help identify these emails, companies have created services that help test and train users to recognize these types of email. Vendors range from Microsoft to KnowBe4 and many others. One inherent problem is that if the test message arrives from an outside source, it tends to be blocked by EOP and never makes it to a user's mailbox. In order to prevent this, many vendors instructed organization to create Transport Rules that would bypass the detection filters in EOP. Microsoft has added a new feature to make this process easier. It is called 'Advanced Delivery', with a sub-feature called 'Phishing Simulation'. PowerShell can be used to manage this feature, from within the Security and Compliance Center PowerShell module.
When creating these exceptions, make sure to remember that by adding these sending servers, many of EOP's filtering services will be bypassed:
- Filters in EOP and Microsoft Defender for Microsoft 365
- Zero-hour Purge (ZAP)
- Default system alerts
- AIR and clustering in Defender for Microsoft 365
- Alerts and AIR will not be triggered
- Safe Links in Defender for Microsoft 365
- Safe Attachments in Defender for Microsoft 365
PowerShell cmdlets
Get-PhishSimOverridePolicy
Get-PhishSimOverrideRule
New-PhishSimOverridePolicy
New-PhishSimOverrideRule
Remove-PhishSimOverridePolicy
Remove-PhishSimOverrideRule
Set-PhishSimOverridePolicy
Set-PhishSimOverrideRule
Default Setup
If we check for Policies or Rules with PowerShell, we see that in a tenant, the default configuration is blank:

Like a lot of other configuration items in Microsoft 365, these two cmdlets form a pair, and we need to create one Policy and one Rule to proceed with this feature. In the section below, we will walk through this creation process.
Adding a Custom Configuration
First, we need a Policy created and must be named 'PhishSimOverridePolicy' due to Microsoft's restrictions of one Policy per tenant:

New-PhishSimOverridePolicy -Name ' PhishSimOverridePolicy'
With this new Policy, we can now create the Rule that controls which servers are allowed to communicate with the tenant. In the one-liner below, we reference the Policy we created, IPs of the third-party Phish Simulation senders as well as two domains that we will allow messages inbound for.
New-PhishSimOverrideRule -Name 'PhishSimOverrideRule' -Policy 'PhishSimOverridePolicy' -SenderDomainIs PracticalPowerShell.com,PowerShellGeek.com -SenderIpRanges 147.160.167.0/26, 23.21.109.197,23.21.109.212
Note that the name you provide will be ignored and a new Rule will be created with a name similar to this:

With the Policy and Rule configured, any Phish simulation from our vendor, as long as it comes from the predefined IPs and is destined for the predefined domains, will be delivered to an end user's mailbox.
REFERENCE: These same settings also appear in the Microsoft Defender Center: Email & Collaboration > Policies > Threat Policies > Advanced Delivery
Post Configuration
Once the Policy/Rule is ready, we can run PowerShell cmdlets to verify the configuration perhaps for validation or documentation purposes. These two cmdlets would serve that purpose and do not need any parameters to execute:
Get-PhishSimOverridePolicy
Get-PhishSimOverrideRule

SecOps Mailbox
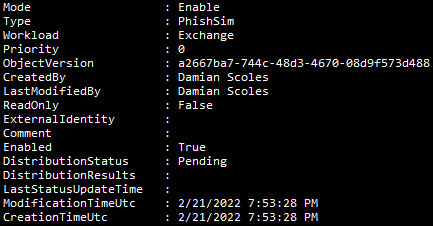
First, what is a SecOps Mailbox? SecOps is shorthand for Security Operations but is also abbreviated to mean an organizations Security Team. The mailbox is a dedicated mailbox which can receive unfiltered email (malicious or not) for a security team to review. To use this feature a dedicated mailbox should be identified or created for this purpose. Once the mailbox is ready, we can use PowerShell to create our Policy and Rule combination for the SecOps Mailbox feature.By default, an organization's tenant should have none listed:
Let's see what PowerShell cmdlets are available to us for configuring this feature:
PowerShell Cmdlets
Get-SecOpsOverridePolicy
Get-SecOpsOverrideRule
New-SecOpsOverridePolicy
New-SecOpsOverrideRule
Remove-SecOpsOverridePolicy
Remove-SecOpsOverrideRule
Set-SecOpsOverridePolicy
Set-SecOpsOverrideRule
Creating New Policy / Rule
When creating a Policy and Rule, we only need the email address of the mailbox to be used for this feature. The name of both the Policy and the Rule cannot be customized and you must use the default names provided by Microsoft. The names of both can be found in the documentation for the cmdlets: New-SecOpsOverridePolicy and New-SecOpsOverrideRule. Once we have those pieces of information, we can create the Policy/Rule combination:
New-SecOpsOverridePolicy -Name SecOpsOverridePolicy -SentTo SecurityTeam@powershellgeek.comNew-SecOpsOverrideRule -Name SecOpsOverrideRule -Policy SecOpsOverridePolicy
Note that only one Policy and one Rule is allowed for SecOps Overrides:

Modify an Existing Policy / Rule
Of course, once this pair is in place, we can also modify the settings if the need arises. However, as normal as that may be in PowerShell, there isn't much to change in either the Policy or the Rule. In the Policy, the Get-Help for the cmdlet shows a lot of options, but in reality, we can only modify the Comment and SentTo properties with either cmdlet. Here are some examples of these parameters in action:
Policies:
Set-SecOpsOverridePolicy -Identity SecOpsOverridePolicy -Comment 'Sec Ops Policy Security Team Mailbox'Set-SecOpsOverridePolicy -Identity SecOpsOverridePolicy -Comment -AddSendTo ITManagers@powerShellgeek.comSet-SecOpsOverridePolicy -Identity SecOpsOverridePolicy -Comment -RemoveSentTo securityTeam@powerShellgeek.com
Rules:
Get-SecOpsOverrideRule | Set-SecOpsOverRideRule -Comment 'Sec Ops Rule for PowerShellGeek.com'
Removing a SecOps Mailbox Policy/Rule
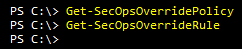
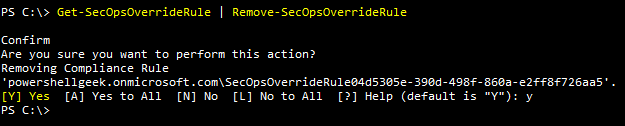
If there is no more need for this feature, it also can be removed from the tenant with two one-liners:
Get-SecOpsOverridePolicy | Remove-SecOpsOverridePolicy
Get-SecOpsOverridePolicy | Remove-SecOpsOverridePolicy

Final Thoughts Conclusion
Defender for Microsoft 365 has many moving parts of which we only explore a few of in this article. As these are all new features for Defender for Microsoft 365, expect to see more features added over time. Not every organization will use these features as some organizations utilize Microsoft's Attack Simulator and do not have a third-party hygiene provider in front of EOP and thus may only use the SecOps Mailbox feature. While other organizations will use all three because they have a third-party provider for Phishing simulations and email hygiene. As such each of these features needs to be evaluated by an organization to determine their needs and scenarios.
Webinar: Automating Exchange / Simplify your Exchange (Online) management with PowerShell - featuring Damian Scoles (MVP)
Do you have frequently recurring tasks in the daily operation of Exchange / Exchange Online?
These include, for example, creating new mailboxes, creating/editing out-of-office settings for employees on sick-leave, monitoring mailbox sizes or managing distribution lists.PowerShell offers good possibilities to automate these and many other tasks. With ScriptRunner the use of PowerShell becomes more comfortable and even more team-compatible. This will free you from routine tasks and establish PowerShell step by step as an automation tool in your business processes.We are happy to have long-time MVP Damian Scoles with us in this webinar. He is a ten-time Microsoft MVP specializing in Exchange, Office 365, and PowerShell who brings over 25 years of experience in the IT industry. In this webinar, Damian Scoles will take you closer to the topic and give you valuable tips!This webinar is aimed at administrators, IT and DevOps professionals, PowerShell developers and IT managers.
In this webinar, we covered:
- The possibilities of the Exchange PowerShell modules.
- How to securely delegate PowerShell-based mailbox management to service desk employees via a web interface.
- Allow users to run certain PowerShell scripts without giving them administrative Active Directory rights.
- Easily manage, repeat, and monitor PowerShell scripts.
- The pre-built scripts (ActionPacks) of ScriptRunner support you with the Exchange administration.
Download the Webinar Recording here!
Related links
- ScriptRunner ActionPacks will help you automate tasks
- Try out ScriptRunner here
- ScriptRunner: Book a demo with our product experts