ScriptRunner Blog
PowerShell Advanced Functions
Table of Contents

PowerShell advanced functions provide the capability to extend a simple PowerShell script to a tool which behaves like a native PowerShell cmdlet. PowerShell advanced functions allow regular scripts to utilize the same set of features available to native cmdlets.
PowerShell advanced functions are built upon four pillars.
- Stream Control
- Parameter Validation
- Pipeline Binding
- Safeguards
In the next few sections, we will be discussing these in more detail.
Stream Control
- Output / Success
- Error
- Warning
- Verbose
- Debug
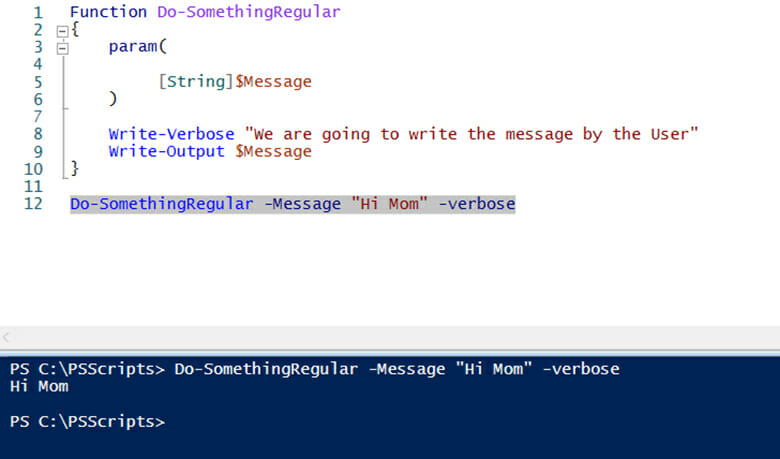
Depending on the context we can leverage inbuilt cmdlets to write to a specific stream, for example if we want to write to the verbose stream, we can use the Write-Verbose cmdlet and so on.
However, just using the right cmdlet is not enough as we can observe in figure 1.
In order for the -Verbose switch to work we need to change our function and add CmdletBinding as shown in the following example:
Function Do-SomethingRegular{
		[CmdletBinding()]
		param(
				[String]$Message
		)
		Write-Verbose "We are going to write the message by the User"
		Write-Output $Message
}
Do-SomethingRegular -Message "Hi Mom" -Verbose
The CmdletBinding attribute exposes a number of features provided by PowerShell engine. It won’t be false to say that CmdletBinding attribute makes our function advanced. As we can observe in figure 2 now, our function correctly writes to the verbose stream.
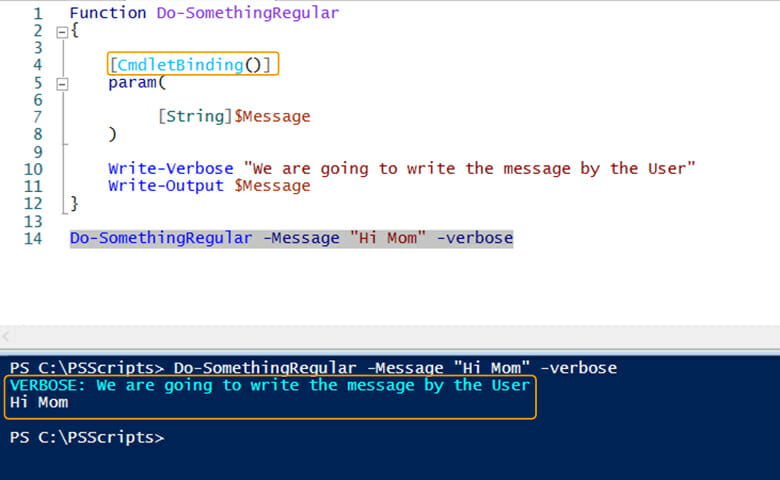
Fig. 2: Adding the CmdletBinding attribute to the function leads to the function correctly writing to the verbose stream
Next, we look at a more complex example which involves the error stream. We first need to define the difference between terminating and non-terminating errors:
- A terminating error is a fatal mistake which will halt the execution of the program.
- A non-terminating error is less serious and will not result in halting the execution of the program.
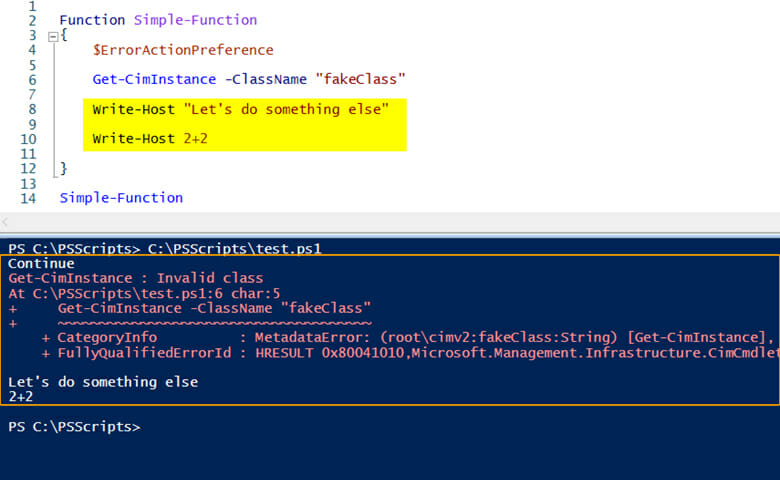
If PowerShell engine encounters a non-terminating error, it first checks the value of the ErrorActionPreference variable to determine if it should continue or terminate the execution. By default, this value is set to “continue” which means that if PowerShell engine encounters an error then it should just continue processing the rest of the script.
We can observe this behavior in figure 3: when PowerShell engine encounters a non-terminating error it generates an error message and continues executing the rest of the script.
But what if we wanted to terminate the script as soon as we encounter the non-terminating error?
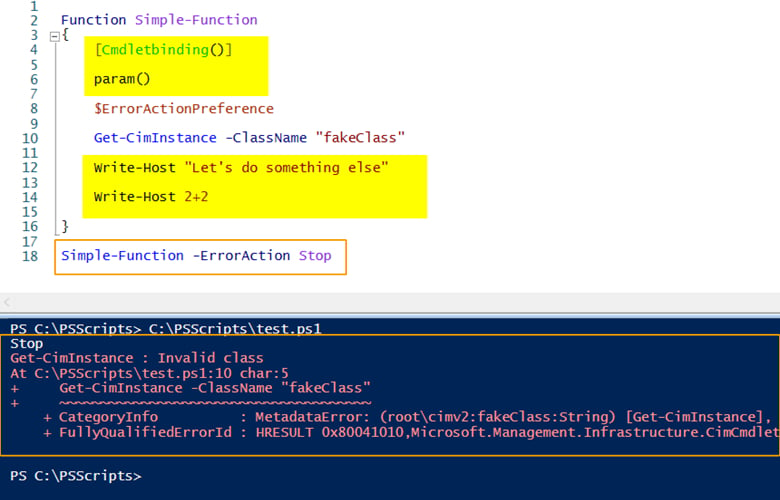
The solution is to modify the value of ErrorActionPreference variable to “Stop”.
However, changing this variable will impact all the other scripts on the system as well as this is a global variable. The solution is to use the -ErrorAction switch as shown in figure 4 and tell PowerShell engine to treat our script as if the “ErrorActionPreference” variable is set to stop. Again, the reason we have ErrorAction switch available is that we are using advanced functions.
Parameter Validation
As such, parameter validation is a very important process before we start using the supplied parameters into our programming logic. PowerShell engine provides a number of built-in mechanisms to validate parameters. Advanced functions can help us leverage this functionality to validate our parameters rather than writing our own parameter validation logic.
In this section we will discuss some parameter validation techniques however this list is by no means exhaustive.
1. Mandatory Parameter
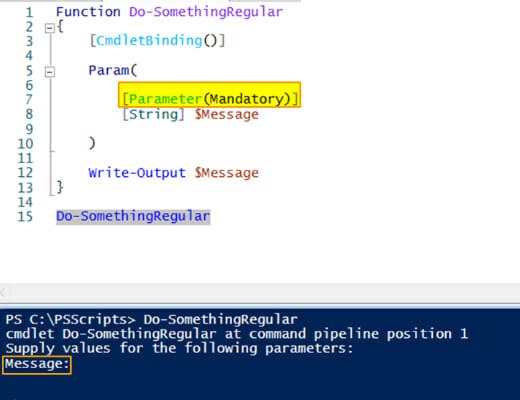
Mandatory parameters help to declare certain parameters as required by the function. If the value is missing, the PowerShell engine will prompt the user for a value (as shown in figure 5). Here’s an example:
# Writing a function with a mandatory parameter
Function Do-SomethingRegular {
		[CmdletBinding]()]
		Param(
				[Parameter(Mandatory)]
				[String] $Message
		)
		Write-Output $Message
}

# Calling the function
Do-SomethingRegular
2. ValidateScript
ValidateScript can be used to run a script against the supplied parameter value. If the script returns $true, then the parameter value is accepted. Here’s an example:
Function Simple-Function {
		[CmdletBinding()]
		param(
				[Parameter(Mandatory)]
				[ValidateScript({Test-Connection -ComputerName $_ -Quiet -Count 1})]
				[string]$computerName
		)
		$ErrorActionPreference
		Get-CimInstance -ClassName win32_Process -ComputerName $ComputerName
}

Simple-Function -ComputerName 'CAT'
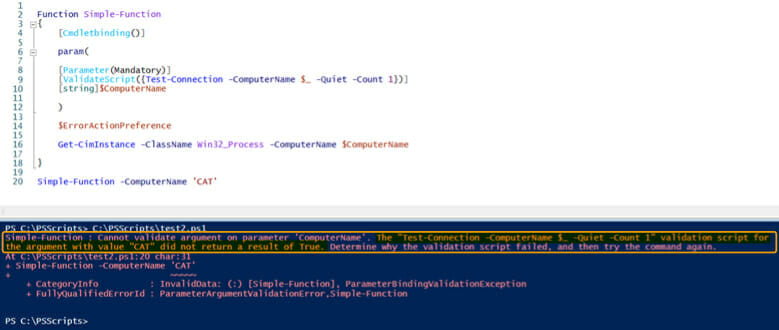
As we can observe in figure 6, we are using ValidateScript to test if we can reach the machine supplied as ComputerName parameter by the user. The script uses Test-Connection cmdlet with -Quiet flag to return either true or false. Since our lab does not have a computer named “CAT” it returns false and validate script fails to accept the parameter value.
3. ValidatePattern
ValidatePattern can be used to validate a parameter value against a regular expression. Here’s an example:
Function Do-SomethingRegular {
[CmdletBinding()]
Param(
[Parameter(Mandatory)]
[ValidatePattern('\b((25[0-5]|2[0-4][0-9]|[01]?[0-9][0-9]?)(.|$)){4}\b')]
[String] $MachineName
)
Get-CimInstance -ComputerName $MachineName -ClassName win32_Process
}
Do-SomethingRegular -MachineName 127.0.01.1
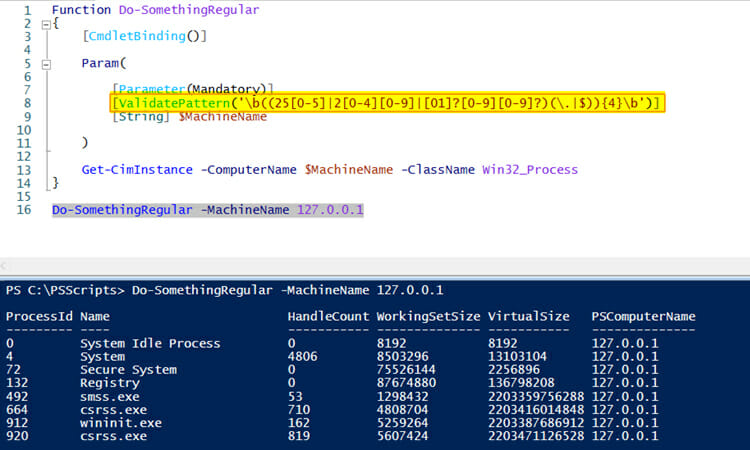
As shown in figure 7 we are validating the supplied value of MachineName parameter against a regular expression for IP address.
4. ValidateSet
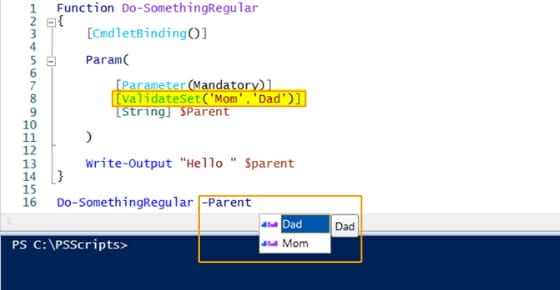
ValidateSet can be used to predefine acceptable values for a parameter (as shown in figure 8). If the user supplies values other than predefined the function returns an error. Here’s an example:
Function Do-SomethingRegular{
		[CmdletBinding()]
		Param(
				[Parameter(Mandatory)]
				[ValidateSet('Mom','Dad')]
				[String] $Parent
		)
		Write-Output "Hello " $Parent
}

Do-SomethingRegular -Parent
As mentioned earlier PowerShell provides a number of parameter validation techniques, however, this blog post has only covered some of them. For more details, read Bruno Buyck’s article on Parameter Validation Concepts in PowerShell and ScriptRunner, for a complete list please read the official Microsoft PowerShell documentation.
Pipeline Binding
PowerShell engine binds the pipeline input “by value” or “by property”. Advanced functions allow us to specify which parameters can accept pipeline input and how binding should take place.
Let’s take a simple example where we are accepting the pipeline input byValue:
Function Do-SomethingRegular{
		[CmdletBinding()]
		Param(
				[Parameter(Mandatory,valueFromPipeline)]
				[String] $name
		)
		Write-Output "You Entered $name"
}
"Sonny"|Do-SomethingRegular
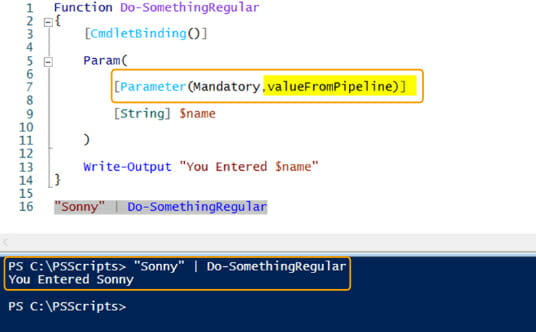
Figure 9 shows that a string object is passed to our function and since the function has a parameter accepting value from the pipeline, the functions executed without any errors.
Similarly, we can modify our function to accept pipeline input byProperty:
Function Do-SomethingRegular{
		[CmdletBinding()]
		Param(
				[Parameter(Mandatory,valueFromPipelineByProperty)]
				[String] $name
		)
		Write-Output "You Entered $name"
}
$MyNewObject = [PSCustomObject]@{name = 'Sonny'; age = 21}
$MyNewObject | Do-SomethingRegular
As shown in figure 10, we created an object with a property name matching the name of our parameter. When this object is passed in the pipeline the PowerShell engine binds the property with the parameters as they have matching name.
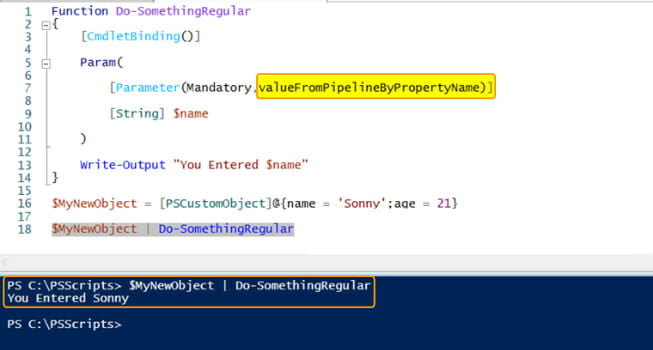
Fig. 10: Passing a single property of an object as parameter value to a function through the pipeline
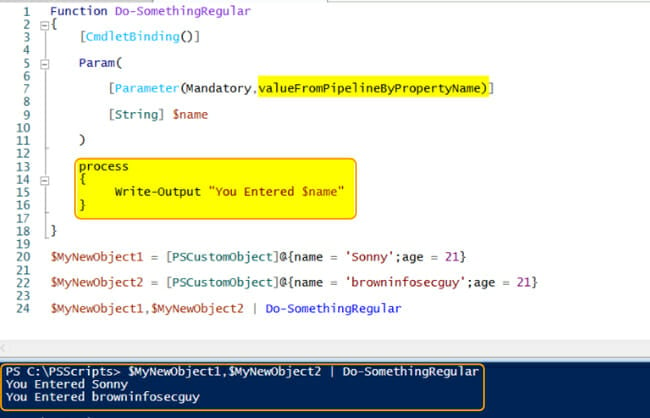
Let’s complicate our example by passing more than one object in the pipeline. Since we are dealing with multiple objects, we need to utilize Input Processing methods. Input processing methods are also known as the BEGIN, PROCESS and END block. A good PowerShell programmer will always use them when writing an advanced function.
As we can observe in figure 11, even with multiple objects the binding follows the same principle as our previous example:
Function Do-SomethingRegular{
		[CmdletBinding()]
		Param(
				[Parameter(Mandatory,valueFromPipelineByPropertyName)]
				[String] $name
		)
		process{
		Write-Output "You Entered $name"
		}
}

$MyNewObject1 = [PSCustomObject]@{name = 'Sonny';age = 21}
$MyNewObject2 = [PSCustomObject]@{name = 'browninfosecguy';age = 21}
$MyNewObject1,$MyNewObject2|Do-SomethingRegular
Safeguards
- WhatIf
- Confirm
These safeguards are controlled by two system variables $WhatIfPreference and $ConfirmPreference. The default value of both these variables is shown in figure 12.
WhatIf
The WhatIf switch can be used to see “what would have happened” without really modifying anything. The behavior is controlled by $WhatIfPreference variable.
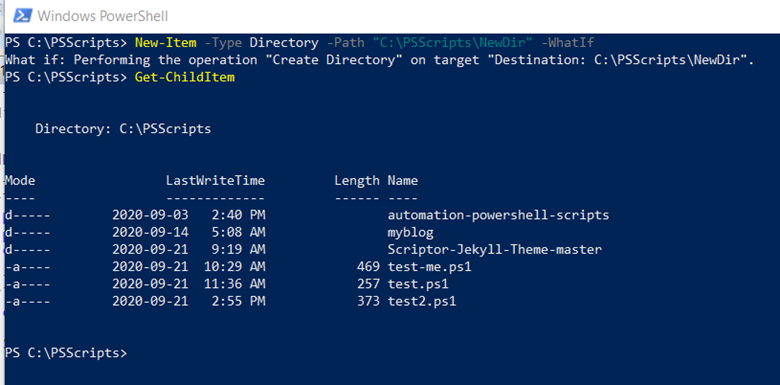
The default value of the $WhatIfPreference is set to false, which is the reason why when we execute any cmdlet, we are not shown a whatif scenario. In order to view the whatif scenario we need to explicitly use the whatif switch as shown in figure 13.
Implementing WhatIf functionality in a function can be achieved by:
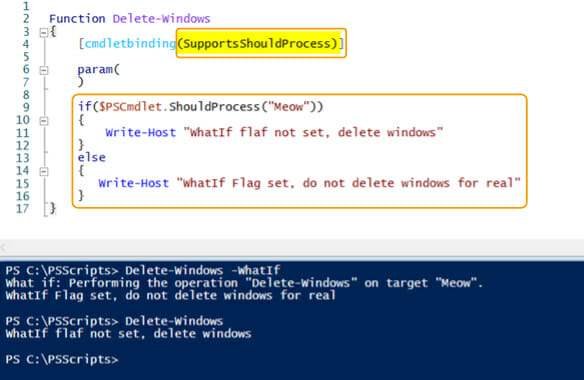
- Adding the SupportsShouldProcess argument to CmdletBinding as shown in figure 14
- Capturing the Boolean value returned by $PSCmdlet.ShouldProcess(“”), If TRUE it means user has not selected whatif option
- Placing whatif logic in an if loop around $PSCmdlet.ShouldProcess(“”)
The following example demonstrates these steps:
Function Delete-Windows{
# First we're adding the “SupportsShouldProcess” argument to CmdletBinding
		[CmdletBinding(SupportsShouldProcess)]
		param(
		)
# Then, we're capturing the Boolean value returned by “$PSCmdlet.ShouldProcess("")”, If TRUE it means user has not selected whatif option
		if($PSCmdlet.ShouldProcess("Meow")){
				Write-Host "WhatIf flag not set, delete windows"
		}
		else{
				Write-Host "WhatIf flag set, do not delete windows or real"
		}
}
Confirm
Confirm switch can be used to prompt a user for confirmation before executing the cmdlet. We can implement the same in our function. As discussed earlier if $ConfirmPreference variable is set to “high” then the cmdlet’s which have the ConfirmImpact variable set to “high” will prompt the user for confirmation before executing.
This brings us another concept, the $ConfirmImpact variable which is used to define the severity of a function. It can accept the following values:
- “Low”
- “Medium”
- “High”
We can also set it to “None” but that will just disable it.
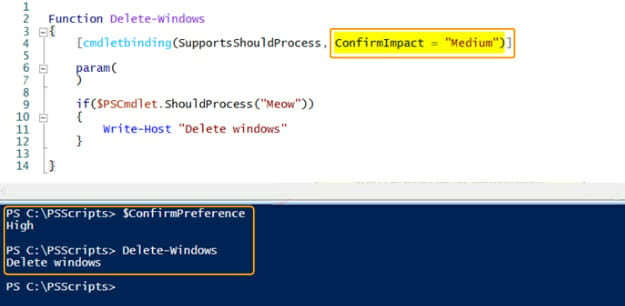
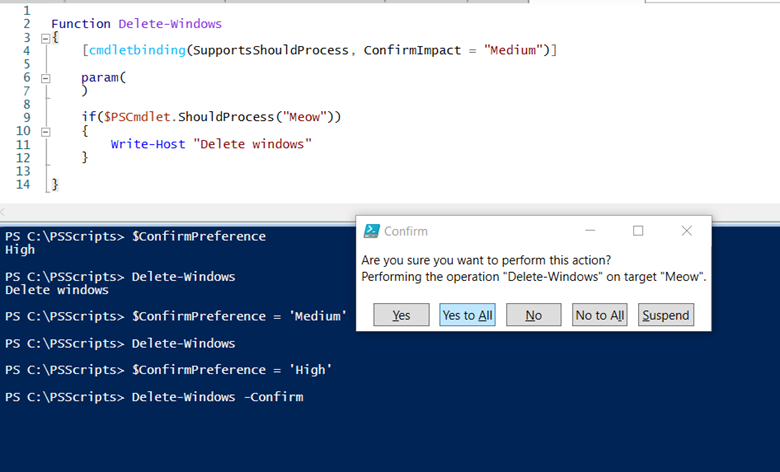
In order to implement confirm in our function we need to add the ConfirmImpact argument to CmdletBinding and initiate a value for it. The PowerShell engine will then compare this value with $ConfirmPreference value and if the severity of our function is equal or higher, the user will be prompted with a confirm dialogue. Here’s an example
Function Delete-Windows{
		[CmdletBinding(SupportsShouldProcess, ConfirmImpact = "Medium")]
		param(
		)
		if($PSCmdlet.ShouldProcess("Meow"){
		Write-Host "Delete Windows"
		}
}
As we can observe in figure 15 since the $ConfirmPreference is set to “High” PowerShell engine did not prompt the user with confirm dialogue as our function has a “medium” ConfirmImpact.
If we change the $ConfirmPreference value to medium then the user is prompted with confirm dialogue box as shown in figure 16.
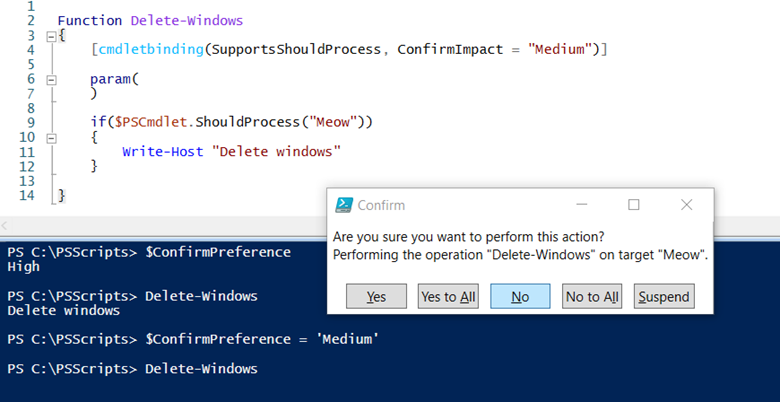
Fig. 16: If $ConfirmPreference value is changed to medium the user is prompted with confirm dialogue box
Now, what happens if we change back the $ConfirmPreference variable to “High”? As expected, if we just run Delete-Windows we will not be prompted with a confirm dialogue box, however if we explicitly use the -Confirm switch then we will be presented with confirm dialogue box as shown in figure 17.
Conclusion
As always if you have any questions or concerns please do not hesitate to reach out.
Cheers!
Related posts
14 min read
Privacy Management with PowerShell – Let's look at the core features of Priva!
Jul 16, 2024 by Damian Scoles
All you need to know about Privacy Management, privacy management policies, rules, and subject rights requests.
Why...
4 min read
Let's celebrate System Administrator Appreciation Day!
Jul 3, 2024 by Matthias Jütte
Every last Friday of July, we get to celebrate System Administrator Appreciation Day, a special day dedicated to...
8 min read
PowerShell 7: What are the pros and cons of switching from Windows PowerShell 5.1?
Jul 2, 2024 by Philip Lorenz
Windows PowerShell 5.1 is usually preinstalled and the default – is it worth switching to PowerShell 7, or will it lead...
About the author:
Sonny is a self-proclaimed PowerShell preacher who lives in the beautiful city of Halifax on the east coast of Canada. Sonny has worked in Cybersecurity for more than 10 years and has acted as the primary technical lead and subject matter expert on many Cyber Security Assessments for various private and public organizations. Sonny regularly speaks at various security conferences such as BSides, AtlSecCon, ISACA, OWASP etc.
Latest posts:
- Privacy Management with PowerShell – Let's look at the core features of Priva!
- Let's celebrate System Administrator Appreciation Day!
- PowerShell 7: What are the pros and cons of switching from Windows PowerShell 5.1?
- Azure Arc & integration in VMware vSphere
- PowerShell Secrets – Bulletproof password management

